Search Results
Design a Cardboard Chair Challenge
In Learning in the Making: How to Plan, Execute, and Assess Powerful Makerspace Lessons, I discuss a Framework for Implementing Maker Experiences as depicted in the following diagram.

I recently asked my 9th grade students to do a cardboard chair challenge. What follows is how the students went through this framework.
Framing or Frontloading the Experience
Framing or frontloading a maker education experience increases the chances that transferable skills and knowledge result, is framing or frontloading the activities as part of introducing them.
This activity was framed as a continuation of the team building and group communication activities in which the students participated the previous week. They were told that they needed to practice the effective communication skills they identified during the previous activities.
The Experience
The experience is, obviously, the doing or making part of the framework. Below is a cardboard chair challenge guide I found from Creativity Lab and which was shared with students via Google Classroom.
Materials
- Zip Snip Cutting Tool
- Makedo screws and mini-tools
- tape measure
- lots of cardboard
Designs Created in Tinkercad
In their small groups, they created their chair designs using Tinkercad.


Chair Construction
In their teams, students built their cardboard chairs using the Zip Snip Cutting Tool and the Makedo screws to connect the cardboard pieces (worked wonderfully I want to add).


Reflecting on the Experience
To reflect on their maker experiences, student work groups were given a set of cards (see below) to, first, pick cards from the deck to verbally answer, and to, second, choose three of the cards to answer in a blog post.


Example Verbal Responses to the Reflection Questions
Reflection Card Blog Post Examples


The Conceptualization: Researching
Finally, students were asked to create a infographics

Example Student Infographics
The Myth of Neutral Makerspaces

Recently, I attended the Nation of Makers Conference whose theme was intentional inclusion. The single comment from the conference that stood out for me was:
Before we consider intentional inclusion, we need to consider and explore unintentional exclusion.
When I think about unintentional exclusion, I think about how implicit biases are present and strong in every human being.
An implicit bias, or implicit stereotype, is the unconscious attribution of particular qualities to a member of a certain social group. Implicit stereotypes are influenced by experience, and are based on learned associations between various qualities and social categories, including race or gender. Individuals’ perceptions and behaviors can be affected by implicit stereotypes, even without the individuals’ intention or awareness. Implicit bias is an aspect of implicit social cognition, the phenomenon that perceptions, attitudes, and stereotypes operate without conscious intention. (https://en.wikipedia.org/wiki/Implicit_stereotype)
Recent research sadly indicates that implicit bias is pervasive and insidious in makerspaces . . .
After a 10-state tour through educational makerspaces (both in-school and off-site facilities with an educational penchant), researchers from Drexel University’s ExCITe Center found a non-inclusive culture with a lack of attention to implicit biases.
Per the study, student participation rates change dramatically from K-8 (where there’s nearly equal participation by gender) to high school (where male students outnumber females by a factor of three). Program leaders and instructors remain predominantly male, and a language analysis of recruiting and instruction materials revealed evidence of implicit bias.
“Implicit bias is pervasive and insidious,” the report states. “Our evidence is specific to gender, but there may be other forms. We recommend open and frank discussions that raise awareness of implicit bias, particularly in language, internal and external communications, and design curricula that may lead to bias.” The most urgent recommendation, according to Kim, is to create concerted efforts around recruitment and language that combat existing bias in gender, race and beyond. (K-12 makerspaces lack inclusive culture, Drexel study says)
Because these stereotypical biases are often implicit and unconscious, it makes them especially resistant to awareness, exploration and modification. Due to this, I don’t believe that a truly neutral makerspace is possible but I do believe efforts should be made towards that goal or end.
Liberatory Consciousness
Liberatory Consciousness was a practice promoted and used during the Nation of Maker pre-conference and threaded through the inclusion track of the conference.
Liberatory consciousness is a force that enables an individual to live his or her life in oppressive systems and institutions with awareness and intentionality.
We understand that inequity, racial and otherwise, is the result of cumulative disadvantage built into social institutions, via law, policy, and everyday practice.
We work from an intersectional perspective, which believes that organizations and communities thrive when they build cultures that are inclusive of wide-ranging ethnic, racial, gender, sexual, religious, and national identities and abilities.
We understand that the targets of oppression are required to be at the center of efforts to transform oppression. http://desireeadaway.com/awareness-analysis-action/
Philosophically, these tenets, in my perspective, are pretty amazing and right on target. The difficulty comes in operationalizing them – making them into concrete practices for makerspaces.
Developing Best Practices for Makerspaces
After the conference, I did an extensive search on codes of conduct and inclusion for makerspaces. I expected to find a decent number of articles on this topic, but became a bit dismayed on how few I found. One article that did stand out for me was by Sylvia Martinez’s Edsurge piece, Making for All: How to Build an Inclusive Makerspace (but it’s from 2015). Some of practices she recommends for creating a more inclusive makerspace:
- Empower students not just to be passive objects of the lessons, but to include them as allies and advocates for making things that matter to them.
- Culturally responsive, situated, and relevant doesn’t mean asking students to write hip hop lyrics about the scientific method. But it doesn’t mean ignoring hip hop either. Seeing cultural practices in a maker light can open doors and blur the lines between teachers and learners.
- Sensitivity to surroundings. Research shows that girls react to surroundings that reflect stereotypical “hacker” culture by denying that they are interested in science and engineering. If you aren’t sure what vibe your classroom or makerspace is communicating, ask some kids.
- Reduce competition. Both overt contests and more subtle competition, like competition caused by a lack of adequate materials and tools, can reduce participation of girls. It can also be a barrier for beginners and students who don’t see themselves as “technical.” The competition aspect raises the stakes to a level that is too risky for students to jump in and try something they may actually enjoy.
- Don’t advantage one kind of building over another. Robots are cool, but the same technologies of micro-controllers, sensors, motors, and lights could make smart clothes, a useful invention for an elderly aunt, or better still, something no one has thought of before. Provide incentives, multiple on-ramps, praise, and glory for all kinds of making.
The Classroom or Library as a Makerspace
Makerspaces, Maker Education, STEM, and STEAM are gaining lots of traction in Kindergarten though college level education. Articles, resources on social media, and conference presentations on these topics are proliferating at a rate that most educators are now familiar with maker education.
Once again this school year, schools will be ramping up robotics programs and opening more makerspaces, according to the latest report from the New Media Consortium and the Consortium for School Networking. As for “important developments” on the horizon, makerspaces (first listed as a trend in the 2015 report) will pick up speed over the next one to two years. As schools continue to foster 21st century skills in students in order to prepare them for the demands of a global workforce, K–12 will see the adoption of more makerspaces and research efforts to surface best benefits and practices. Furthermore, the report noted that “makerspaces were initially lauded for their role in stimulating interest in STEM fields,” but now they are often viewed as conduits to STEAM education with more emphasis on the humanities, visual arts, dance, drama and other areas of the arts (Ravipati, 2017).
Makerspaces like vocational shops and science labs are great additions to schools. They often contain the tools, machinery, and technologies associated with making – 3D printers, laser cutters, vinyl cutters, high tech robotics, vocational tech machinery. These are great for educational institutions and learners that can afford them.
Problems occur when administrators, educators, learners, and communities come to believe that maker education is synonymous with these tools and spaces. First, they may be out of budget for schools especially those serving lower income populations. Second, the regular classroom teacher or librarian may be intimidated with these advanced tools and technologies. Finally, in order to prevent maker education in becoming the educational flavor of the month, administrators, educators, and libraries need to not be seduced by these high tech tools. The longevity and sustainability of maker education will depend on making it feasible, approachable, and accessible to the masses of educators.
Public focus on maker education often centers on flashy technology, but it is more than just that. Maker education is about building educational experiences that are based in the real world, that allow student choice, and that achieve multiple objectives. Maker education can be used in a variety of ways and projects can be adjusted in scale or scope to meet individual class or student needs. The key to successful maker education implementation is finding project ideas that seamlessly integrate “making” into the lessons. In the end, maker education is all about providing engaging experiences for students that brings out the best in them in the form of problem solving and determination (https://sparkfuneducation.com/what-is-maker-education.html.).
With these broader definitions and approaches to maker education, and with the realization that maker education does not have to be about the shiny, new toys; more school administrators, librarians, and educators may be willing to embrace maker education within their own work settings. A classroom or library can be at least partially transformed into its own makerspace, a space for powerful student learning by doing the following actions workable and realistic for most librarians and educators:
A classroom or library can be transformed into its own makerspace, a space for powerful student learning by doing the following realistic and workable actions:
- Removal of Obsolete, Non-Flexible Classroom Desks (including the traditional teacher’s desk)
- Spaces for Playing, Tinkering, Making, Collaborating, Discussing, Researching, Reflecting
- An Agile and Nimble Learning Environment
- Materials Openly and Easily Available
- Materials and Activities to Spark Diverse Learners and Their Diverse Interests
- Scavenged Materials
- A Place and Space That Supports Chaos and Messiness
- Accessible, Low-Entry, High Ceiling Materials and Activities
- A Learning Environment Driven by Learner Choice and Voice
- The Space Screams of Fun and Engagement
- The Space Screams of a Maker Mindset Not the Stuff

Removal of Archaic, Non-Flexible Classroom Desks
The image that often comes to mind about the classroom desk is one that features a plastic chair with chrome legs and a fiberboard tabletop that partially encloses a student’s body (for a history of the classroom desk, see A Visual History of School Desks). The first step for creating a classroom or library space that supports making is to get rid of these archaic pieces of furniture that seem to have been invented more for control than for learning.
The idea that students must be seated at desks working in rows is quickly becoming archaic. Technology and collaborative work environments are changing the design of learning spaces. Experts hope that the emerging paradigm will translate into improved learning spaces (Learning Environment: 20 Things Educators Need to Know about Learning Spaces).
Spaces for Playing, Tinkering, Making, Collaborating, Discussing, Researching, Reflecting
Classroom educators and librarians may wonder how they might create spaces for playing, tinkering, making, collaborating, discussing, researching, and reflecting. First and foremost, they need to develop an innovator’s mindset, one outside of the box of what a classroom should look, sound, and be like. Second, practitioners need to become intentional in insuring that a full spectrum of making skills, attitudes, and knowledge is offered to learners. What will follow is educators and librarians who are creative, innovative, and resourceful in creating spaces that can offer a variety of learning activities. The types of desired learning activities should drive how the learning space should be set up as discussed in the case studies reported by the Hechinger Report article, Personalized Learning: Why Your Classroom Should Sound Like A Coffee Shop:
As a first step, they began with ideas and used them to define the space. Searching questions such as “What types of activities will define this flexible space?” were used to escape the constraints of the physical space and get beyond our own set of normal limitations.
An Agile and Nimble Learning Environment
The intentional use of flexible seating that form agile and nimble learning spaces support the learning intentions discussed in the previous section.
An agile learning environment is an educational playground that is intentionally designed to be adjustable, exchangeable and moveable. The learning space is designed to support idea generation, collaboration and experimentation. agile learning environments ultimately showcase how the design of a physical space, as well as the implementation of technology within that space, can shift how people communicate with one another.
The primary goal of an agile learning environment is flexibility. The furniture in the space, and the technology used within it, are flexible so that it can be configured and re-configured to suit different approaches to learning and teaching. An agile learning environment has the ability to turn a static or ‘dead’ space into a dynamic space (The primary goal of an agile learning environment).
With some creativity and flexibility, the practitioner can set up a unique, multipurpose space to serve the goals of making, the learners, and multipurpose uses specified above. The spaces become agile and nimble. There are lots of resources that discuss flexible seating. Here is a ScoopIt aggregate of resources http://www.scoop.it/t/flexible-seating-1
Affordable and Scavenged Materials
There are so many avenues for acquiring materials for the classroom or library seeking to be at least a part-time makerspace.

Once educators open themselves up to all of the possibilities of making, they will find free materials everywhere – cardboard at stores; recycled plastic bottles at school or the local recycling center; the storage closet at school where all of the old science kits are stored (I’ve found them at every school where I work) with all kinds of making supplies; old technologies and appliances for learners to take apart and build new inventions

Affordable Materials Openly and Easily Accessible
In a learner-centered classroom environment, materials are displayed openly – being accessible to the learners on an as-needed-when-needed basis. Both of the elementary schools where I work have general consumables for educators (and I believe it’s true for most schools): xerox paper, butcher block paper, crayons, scissors, tape, markers, rubber bands, paper clips. These materials are stored openly in bins in cubbies for my learners.
Materials such as these can provide a foundation for making; brainstorming, prototyping, reflecting and should be available for learners to use for their making activities without asking the teacher. Having them displayed can spark learners’ ideas. So when a learner says, “I need some paper.” (They ask because of their previous school experiences.) My comment back is, “Then go get it.”
Materials and Activities to Spark Diverse Learners and Their Diverse Interests
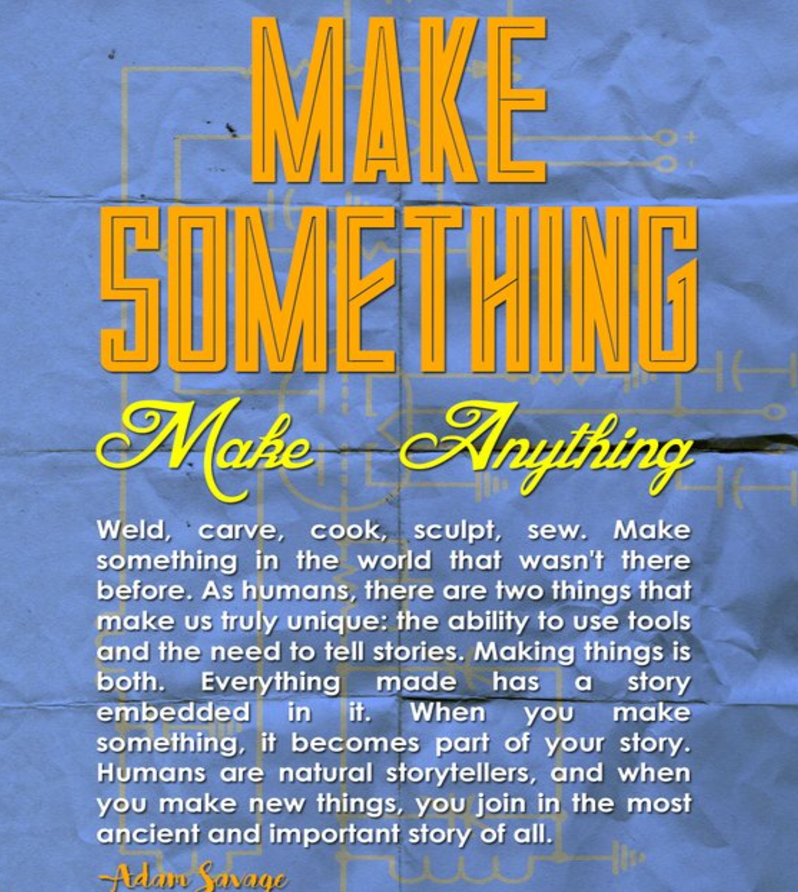
The maker education and maker spaces movements are way too often symbolized by the machines; 3D printers, laser cutters, high tech components (Raspberry Pi and Arduino) and way too often it is white males who are attracted to these machines. In order to respect the diverse learners represented by gender, age, ethnic and racial background, then first, the definition of making needs to be expanded. As Adam Savage of Mythbusters fame noted in his 2016 Bay Area Maker Faire talk:
What is making? It is a term for an old thing, it is a new term for an old thing. Let me be really clear, making is not simply 3D printing, Art Lino, Raspberry Pi, LEDs, robots, laser and vinyl cutters. It’s not simply carpentry and welding and sculpting and duct tape and drones. Making is also writing and dance and filmmaking and singing and photography and cosplay.
Every single time you make something from you that didn’t exist in the world, you are making. Making is important; it’s empowering. It is invigorating, but why? There are lots of results that are good that come from making. We improve the world around us. We show people how much we care about them. We solve problems, both personal and societal (Adam Savage’s 2016 Bay Area Maker Faire Talk).
With this expanded definition of making, it follows that the activities and materials in the classroom or library should reflect the diverse learners and their specific interests.
A Place and Space That Supports Chaos and Messiness
Traditional classrooms and libraries are often marked by students at their desks completing their learning tasks quietly, independently with as little movement of possible. This is opposite of what happens in a making environment. The classroom or library becomes loud, seemingly chaotic, and messy, but authentic and engaged learning is often messy.
Learning is often a messy business. “Messy” learning is part trial and error, part waiting and waiting for something to happen, part excitement in discovery, part trying things in a very controlled, very step by step fashion, part trying anything you can think of no matter how preposterous it might seem, part excruciating frustration and part the most fun you’ll ever have. Time can seem to stand still – or seem to go by in a flash. It is not unusual at all for messy learning to be …um …messy! But the best part of messy learning is that besides staining your clothes, or the carpet, or the classroom sink in ways that are very difficult to get out … it is also difficult to get out of your memory! (http://www.learningismessy.com/quotes/)
Accessible, Low-Entry, High Ceiling Materials and Activities
“When discussing technologies to support learning and education, my mentor Seymour Papert often emphasized the importance of “low floors” and “high ceilings.” For a technology to be effective, he said, it should provide easy ways for novices to get started (low floor) but also ways for them to work on increasingly sophisticated projects over time (high ceiling).” Mitch Resnick in https://design.blog/2016/08/25/mitchel-resnick-designing-for-wide-walls/
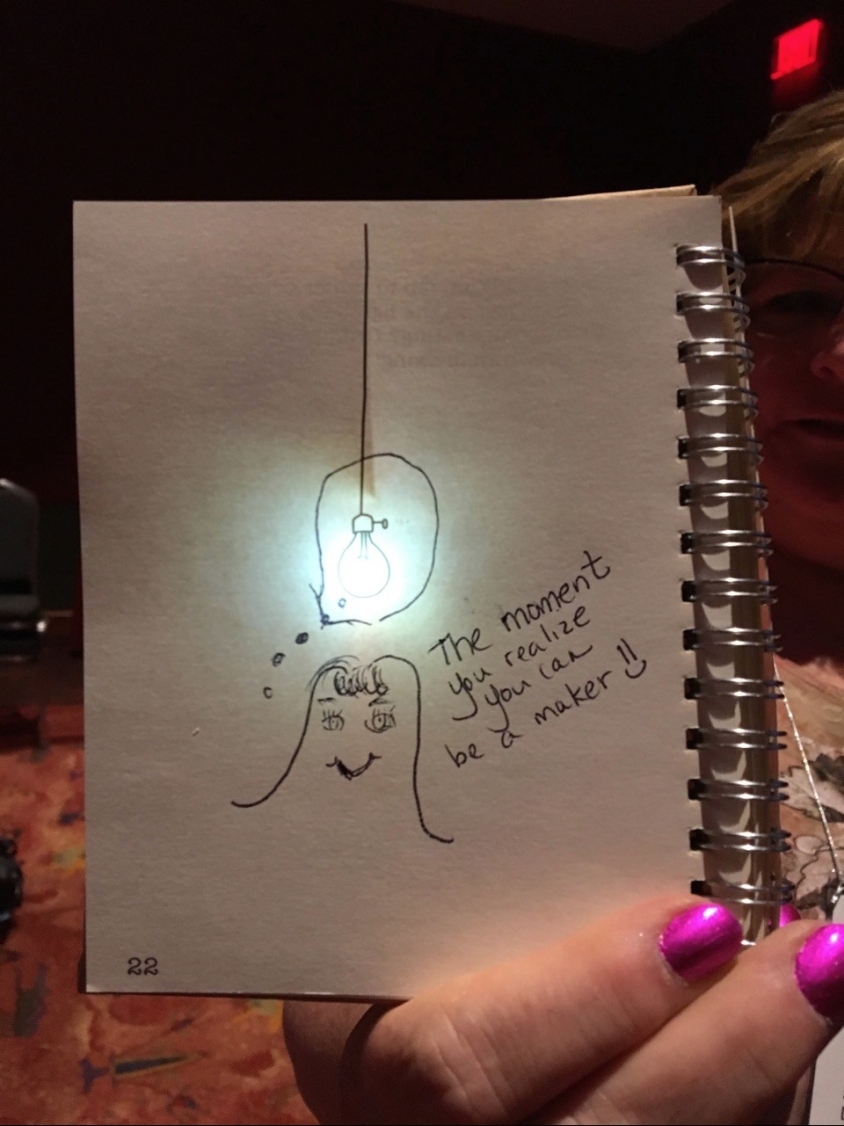
I do conference presentations where I have educators and librarians make paper circuits and Gami-bots. The success rate for these projects is 100% which translates into low entry into making (I took liberty to change low low to low entry). At one of my recent workshops, one teacher made the following design out of her paper circuit which says, “The moment your realize you can be a maker.”
Similar materials can also create a high ceiling or more complex activities such as advanced art projects, most complex paper circuit projects, use of more advanced maker technologies.
A Learning Environment Driven by Learner Choice and Voice
The bottom line of setting up a learning environment based on the tenets typically associated with making is that learner voice and choice is enhanced. When choice and voice are intentionally built into learning then school and education work.
School works when students have opportunities to produce quality work about issues that matter. Education works when people have opportunities to find and develop unaccessed or unknown voices and skills. Audre Lord poignantly describes this “transformation of silence into language and action [as] an act of self-revelation.” Opportunities for flexibility and choice assist learners in finding passion, voice, and revelation through their work (Student Choice Leads to Student Voice).
The Space Screams of Fun and Engagement; a Place for and By Learners
Piaget famously noted that play is the work of children and I have the belief that all humans maintain the sense of wonder of a child. Embedding fun into making; into learning in general increases engagement, joy, creativity, innovation, and collaboration.
In our test-driven educational world of today being on task and on time in many schools leaves little time for play. Lunch periods have been shortened and days and years have been lengthened in an apparent quest to make our students into perfect little technicians, automatons who can react specifically in isolation to a set of pre- set stimuli in a consistent and certain way. Little room is left for the unexpected or the un-planned in our modern classrooms. It is a strangely disastrous way to prepare our children for a future where it appears that the only constant will be continual change. By play I do not mean little league, dance, or any other adult controlled activity. It must be kid controlled, kid directed, and kid policed for real learning about life to take place. Is it possible that our current infatuation with the concept that spending more time on something will make it better is so logical and easily observable and testable that just as logic and observation has in the past it might make people believe that the Earth is flat? (“Play is the work of children”….. J. Piaget).
Fun can be felt, seen, experienced when as soon as learners and visitors walk into the space. I love watching the faces on visitors when they enter my own classroom. They light up as they see my sofas, chairs, lamps; making supplies in cubbies in the back of the room; and most of all my learners’ work such as LED lit on student-generated posters hanging on the wall, paper roller coasters in-process of being made, and Lego creations on the Lego wall.
The Space Screams the Maker Mindset Not the Stuff
The battle cry of educators using educational technology is that the pedagogy needs to come before the technology. I am baffled, then, why I go to edtech conferences and find so many sessions on the technology, e.g., 60 apps in 60 minutes. The same seems to be true for the maker movement these days. Practitioners talk about the maker mindset and then speak of the shiny new toys they use without talking about the context – of what skills and knowledge students learn from it. For example, with the 3D printer, they might talk about the Yoda they made and I say, “So what?” It really is about having a maker mindset not about the shiny, new maker tools. It’s about the making process; about the engagement, creativity, innovation, struggles to complete a difficult task, sense of accomplishment. A cardboard box, for example, can become a chariot, rocket, robot, marble run, Foosball game, dollhouse, Hot Wheels track, house, fort, castle, game.
We must exercise the discipline to refrain from attaching too quickly to an idea just because it’s new. Making is no exception, so to truly prepare ourselves to be successful in this new venture, let’s be sure we set our students up to have the right mindset to be courageous innovators (6 Must-Haves for Developing a Maker Mindset).
With a maker mindset and some of the strategies outlined above, any classroom or library can become a makerspace.
Design Thinking Process and UDL Planning Tool for STEM, STEAM, Maker Education
Post by Jackie Gerstein, Ed.D. @jackiegerstein and Barbara Bray @bbray27. Crossed posted at http://barbarabray.net/2017/06/08/design-thinking-process-and-udl-planning-tool/.

If there is a makerspace in your school, it may be down the hall, in the library, or in another building. If there is someone other than the teacher managing the makerspace or there is a schedule for the school, your kids may only be able to use it once a week or month. Some makerspace activities may be focusing on how to use the resources available and may not be connecting the activities to the curriculum or around a real world problem. If this is how the makerspace is set up in your school, then your kids may not have access to the resources, materials, and tools when they need them, especially for STEM or STEAM.
In deciding what resources you need based on the learners you have, you may first need to determine how your learners learn best, what projects you plan to do, how you can set up a makerspace in your classroom, and much more. This is why we decided to create a planning tool for makerspaces in the classroom for you using the Design Thinking Process and Universal Design for Learning®.
The Design Thinking Process
Design thinking is an approach to learning that includes considering real-world problems, research, analysis, conceiving original ideas, lots of experimentation, and sometimes building things by hand. The projects teach students how to make a stable product, use tools, think about the needs of another, solve challenges, overcome setbacks and stay motivated on a long-term problem. The projects also teach students to build on the ideas of others, vet sources, generate questions, deeply analyze topics, and think creatively and analytically. Many of those same qualities are goals of the Common Core State Standards. (What Does ‘Design Thinking’ Look Like in School?)
We adapted the Design Thinking Process to include additional phases based on our own experiences in schools with educators and kids.
 Define the Problem: The educator along with the learners generate possible authentic problems to explore within their local community (classroom, school, social, community) which includes identification of the intended audience.
![]() Empathy and Perspective Taking: Learners interview clients to gain an understanding of their needs and to see the problem from their perspective. The educator can assist learners in the interview process including how to develop interview questions.
Empathy and Perspective Taking: Learners interview clients to gain an understanding of their needs and to see the problem from their perspective. The educator can assist learners in the interview process including how to develop interview questions.
![]() Idea Generation: Learners, typically working in small groups, generate lots of ideas and questions to ask to solve the design thinking problem or challenge. Each generated possible design is analyzed as to its potential to resolve the design challenge.
Idea Generation: Learners, typically working in small groups, generate lots of ideas and questions to ask to solve the design thinking problem or challenge. Each generated possible design is analyzed as to its potential to resolve the design challenge.
 Sketch Design: A blueprint or sketch of the selected design is created through pencil and paper or through an online tool such as Google Draw or Sketchup. This design can be pitched to another group for constructive feedback.
![]() Prototype – Test – Refine: This phase is the actual creating and building of the product. To get the product to work as the plan often takes several iterations of prototype, test, and refine. Learners are encouraged to use the tools and building processes that work for them.
Prototype – Test – Refine: This phase is the actual creating and building of the product. To get the product to work as the plan often takes several iterations of prototype, test, and refine. Learners are encouraged to use the tools and building processes that work for them.
 Feedback from User: The final design is presented to the users for their feedback. The designers ask the users about the degree to which the design met their needs asking specific questions about what worked and what still needs improvement.
![]()
Final Reflection: Learners reflect on the process in a way that works best for them – blogs, photo essays, video recording, podcast, sketchnotes, illustrated ebook.
![]() Share Out: A goal of the design thinking process is sharing learning out to a broader public. This is typically done by sharing documentation of learning and final reflections through social media.
Share Out: A goal of the design thinking process is sharing learning out to a broader public. This is typically done by sharing documentation of learning and final reflections through social media.
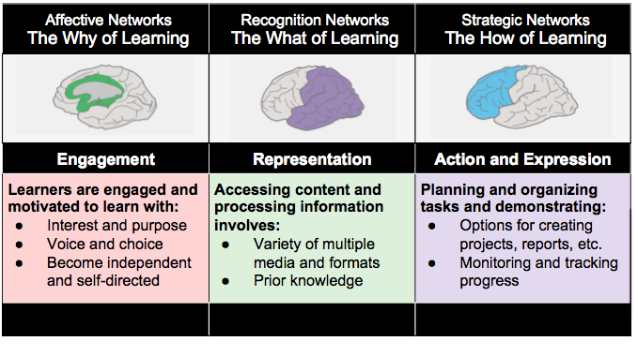
Universal Design for Learning (UDL)
Universal Design for Learning (UDL) was developed by David Rose and Ann Meyers of the Center for Assistive Special Technology (CAST). UDL was designed to reduce the barriers to the curriculum and maximize learning. UDL provides a framework for all learners to help them become self-directed and independent expert learners. UDL has reordered the principles and guidelines, to begin with, Multiple Means of Engagement, the Why of Learning that compliments how the Design Thinking Process involves learners in identifying an authentic problem or challenge.
- Multiple Means of Engagement (Why) is the affective network that explains how interest and purpose engages and motivates learners to want to learn.
- Multiple Means of Representation (What) is the recognition network how content is represented and how learners process information.
- Multiple Means of Action and Expression (How) is the strategic network involving how learners monitor progress and demonstrate and reflect evidence of learning.
The National Center on Universal Design for Learning goes deeper referring to the alternate version of the UDL Guidelines found in the book UDL Theory and Practice by David Rose and Ann Meyers where the order of the principles and the guidelines have changed. The UDL Guidelines provide a deep dive into each of the principles to checkpoints that provide resources, examples, and research. We pulled together the phases of the Design Thinking Process and identified specific options under each principle to create a Design Thinking Process and UDL Planning Tool for teachers.
Design Thinking and UDL Planning Tool
In the initial phase of defining the problem, the teacher involves learners to generate possible authentic problems within their local community. The problem can be defined by the teacher to encourage learner interest. We connected the UDL principle Multiple Means of Engagement to this phase by providing options for recruiting learners’ interest through optimizing relevance, value, and authenticity. To understand the problem, the teacher activates learners’ background knowledge and invites them to highlight patterns and critical features around real world problems that impact them.

 The UDL connection to Engagement to the second phase of Empathy and Perspective Taking made so much sense to us. The UDL connection involves learners having options for sustaining effort and persistence by fostering collaboration and community. This phase is where learners gain an understanding of the needs of specific people about a problem from their perspective. They may interview, do observations or survey them about the problem.
Some lessons can involve a specific problem identified by the teacher who first wants to encourage empathy. We provide one example around an Egg Drop and the Design a Squishy Circuit for a Classmates (see these examples at the end of this post).
The middle phases of the Design Thinking Process involve the iterative steps related to idea generation and prototype-test-refine as well as getting feedback from the users.

As can be seen in the UDL Connections column of the Design Thinking and UDL planning tool, representation and action and expression can be explicitly addressed. Representation or the What of Learning is a strong focus during the Idea Generation and Feedback from Users phases as the educator helps learners highlight patterns, critical features, and relationships of their discoveries. The Action and Expression or the How of Learning emerges most strongly during the Creating a Blueprint and Prototype-Test-Refine Phases as learners include their own personal touches and preferred means of expression.

The final phases of the Design Thinking Process involve reflection on the design and making experiences and then sharing out the results to a broader audience.

 The UDL connection to Action and Expression is especially strong in the final phases of Reflection and Sharing Out. During the reflection phase, learners are given the option to express what they learned during and because of their STEM, STEAM, Maker Education experience in a way that makes the most sense to them given the nature of the task; and their preferred means of expression. This is especially relevant given all that technology and online tools provide.
For example, students can write a blog, create a photo essay with a caption, record a podcast or video, do a hand-drawn or online sketch, create a comic. Learners, many being savvy at the use of social networks, can then choose how they want to share out their reflections. This serves several purposes related to Action and Expression: (1) it gives learners an authentic audience, and (2) it helps other makers learn from their personal experiences.
Examples of STEM, STEAM, and Maker Education Activities using the Design Thinking and Universal Design for Learning (UDL) Planning Tool
We hope the Design Thinking and UDL planning tool we developed helps you guide the design of learning activities that focus on STEM and STEAM and brings makerspaces into your classrooms.
We will be discussing this topic in the Twitter chat (#plearnchat) on Monday, June 19 at 4 pm PT, 5 pm CT. We ‘re also going to be sharing more details including redesigning makerspaces in the classroom in our presentation at ISTE 2017 in San Antonio on Monday, June 26 11:30 to 12:30. Please join us!
We welcome any comments, ideas, or questions.
 Dr. Jackie Gerstein’s byline is, “I don’t do teaching for a living. I live teaching as my doing . . . and technology has amplified my passion for doing so.” Dr. Gerstein has been teaching in-person and online for several decades. Currently, she teaches master’s level online courses in educational technology for Boise State, Walden, and Western Governors’ Universities as well as gifted elementary education where she focuses on STEM, STEAM, and Maker Education.
Jackie actively blogs at https://usergeneratededucation.wordpress.com/ and tweets at https://twitter.com/jackiegerstein
Additional Resources referenced from Jackie’s blog:
- Introducing Design Thinking to Elementary Learners
- Video Game Design with Elementary Learners
- Student Voice Comes With Teachers as Listeners
- Giving Students a Voice Models High-Quality Learning Processes
- Today’s Education Should Be About Giving Learners Voice and Choice.
- Show Learners The Possibilities and Get out of the Way

Barbara is a teacher, writer, change agent, risk-taker, instructional designer, connector, futurist and visionary. Whenever anyone told Barbara she couldn’t do something, she took it more like a challenge. New and veteran teachers are overwhelmed with day-to-day tasks plus being asked to teach and integrate technology or to change their curriculum. The big question even today is “how do you fit everything in that is expected of you and meet the needs of all students?”
Barbara co-authored two books on personalized learning with Kathleen McClaskey:Make Learning Personal and How to Personalize Learning. She wrote a regular column on professional development for OnCUE (Computer Using Educators) for over 17 years and continues to write here, for Personalize Learning, chapters in books, articles, and as guest posts on other blogs. She works tirelessly to find and research new tools and methods that help educators and personalize learning. Now with multiple opportunities to network using social media and join various online communities, teachers and learners are confused. Barbara makes it her job to determine what is authentic, valid, cost-effective, safe, user-friendly, and relevant for her clients. She is relentlessly researching how to personalize learning so all learners follow their passion so they discover their purpose.
Barbara actively blogs at http://barbarabray.net/ and tweets at https://twitter.com/bbray27
Science-Based Valentine Day Projects
I really like using maker education and STEM/STEAM projects to celebrate holidays and special events. My method of teaching new concepts is to use the Stages of Make Education that I presented in Learning in the Making: How to Plan, Execute, and Assess Powerful Makerspace Lessons:

The following Valentine Day projects were completed by my 3rd through 6th grade gifted students. Due to the new skills involved, they were asked to copy the basic instructions. Then as is typical of my students, then went quickly into the Advance and Embellish Stages of Making.
Circuit-Based Valentine’s Projects
NGSS Standards Addressed
- Make observations to provide evidence that energy can be transferred from place to place by sound, light, heat, and electric currents.
- Apply scientific ideas to design, test, and refine a device that converts energy from one form to another
Introduction
I began asking who knew what an electric circuit. Sadly, none did. I showed them Electric Circuits – BrainPop UK https://youtu.be/3LsXGAbwTOQ
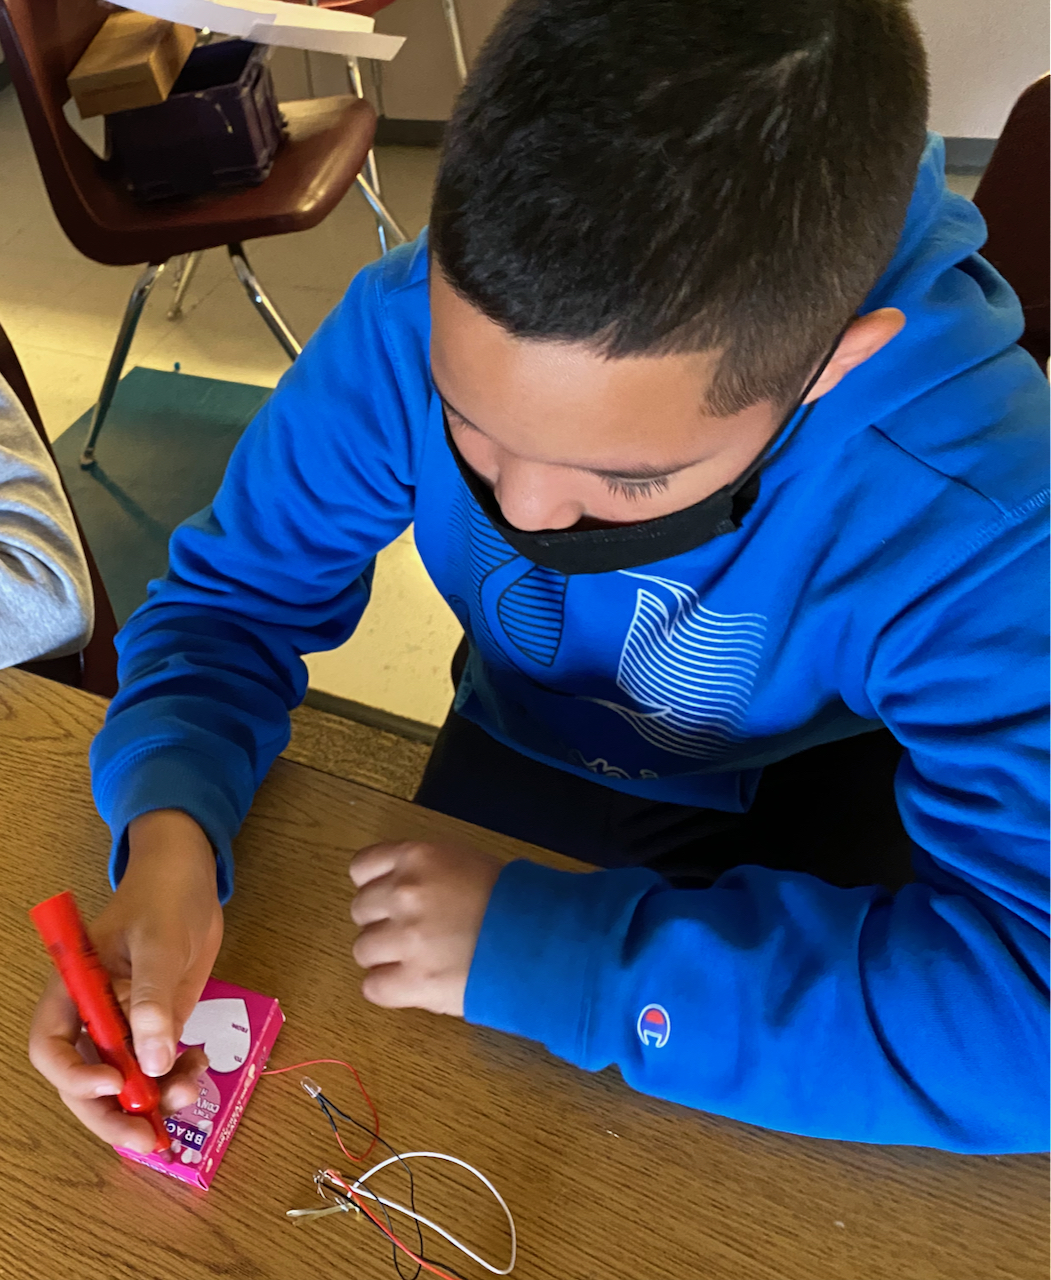
Circuit Project 1: Conversation Hearts Box Operation Game
Project Description
The Instructable, Operation Valentine: a Game, a Gift, a Lesson in Electric Circuits, was used for this project. I substituted aluminum tape for the paperclip and pre-wired LEDs instead of the Christmas lights.


What follows is a video that shows how one student took this project from Copy to Embellish of the Stages of Making:
Circuit Project 2: Chibitronic LED Valentine Day Card
For this activity students were asked to create a Valentine Day card by making a paper circuit using a Chibtronic LED and a cardstock switch built into the circuit. I adapted the activity from two activities from their website:
- https://chibitronics.com/2020/02/15/valentine-light-up-card/
- https://chibitronics.com/2020/02/05/happy-valentine-with-light/
I cut out the front “cover” of the card using my Cricut machine to show a heart where the light would shine through. The students chose a piece of colored tissue paper to cover it. Instead of providing a circuit temple, I drew it on the whiteboard and asked the students to draw their own on another piece of cardstock.


This student were from the Copy Stage to the Advance Stage of Making by creating a popup card he figured out and crafted:
A Little Chemistry
NGSS
By the end of middle school, students will be able to apply understanding that pure substances have characteristic physical and chemical properties
Introduction
I showed them Physical and Chemical changes (Brain pop) https://youtu.be/hq8K-dF8_4c
Project Description
I used the following video as my reference for both materials and procedures:
What the students’ molds and candy looked like . . .
Halloween Displays: A Perfect STREAM (Science, Technology, wRiting, Engineering, Art, Math) Lesson


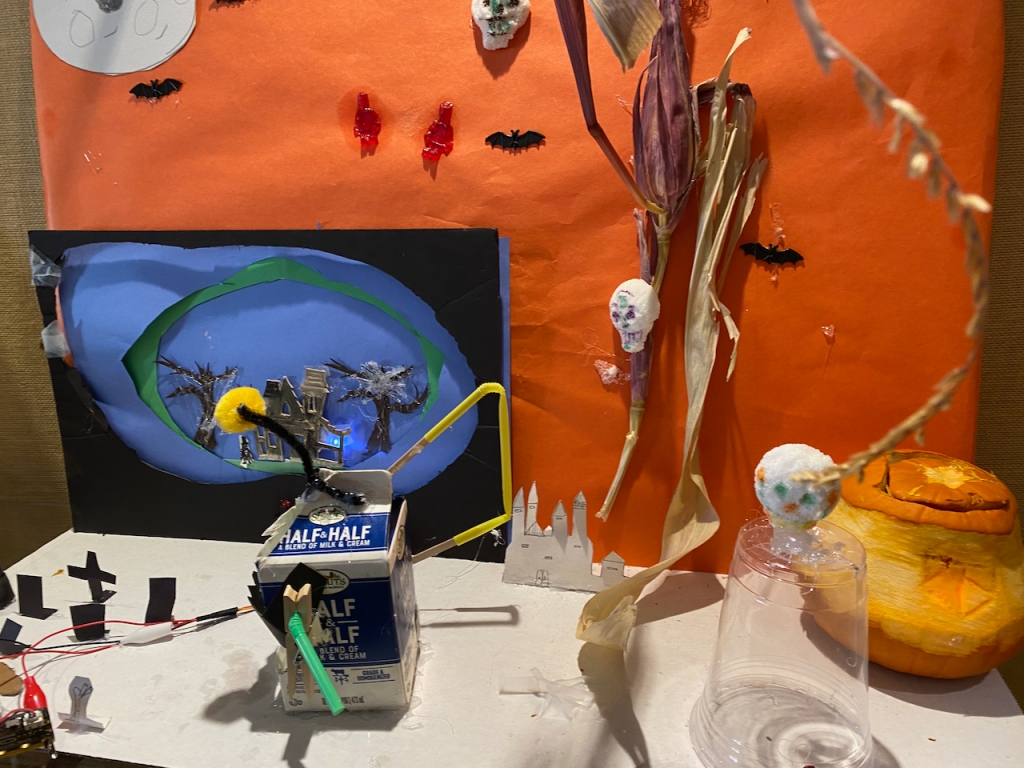
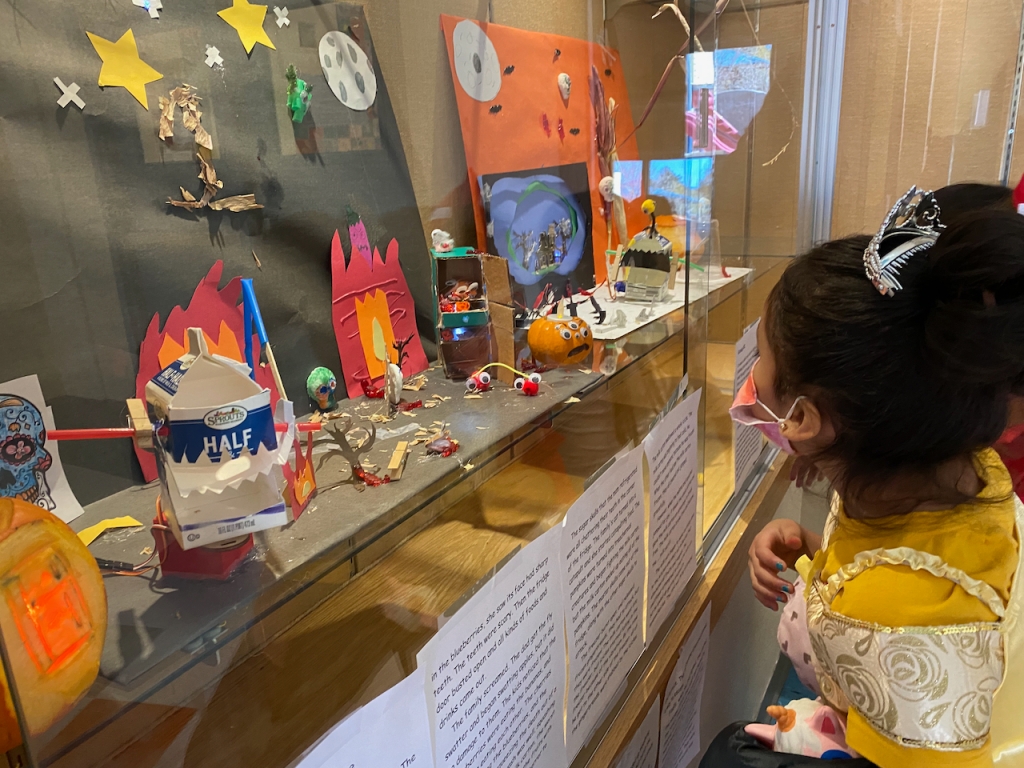

Wow, wow, wow! My students finished their displays in time for Halloween after spending many, many hours working on them. Now, they are in display cases in the lobby of our elementary school. I am so proud of them and rightfully, they are very proud of themselves, too. They worked so hard on them.
A little history . . . I love Food Channel’s competitions and Halloween Wars tops my list. This is where I got the idea for this lesson. Each Halloween season, I become enamored with the passion, creativity, talent, and skill of the sugar, cake, and pumpkin artists on this show. This led me into wanting to bring this type of passion into my classrooms; so several years ago I started a yearly Halloween Wars during each Halloween season (none during our COVID shutdown, though); and yes, it’s a team competition which makes it even more exciting for the students. Needless to say, I was thrilled to bring it back this year allowing a new group of students the opportunity to experience it. As mentioned in the title, I believe this to be a perfect STREAM (Science, Technology, wRiting, Engineering, Art, Math) lesson. This post describes the learning activities and standards addressed.
Background Information
The principles that drive my instructional approach. regardless of theme, include:
- Instructional challenges are hands-on and naturally engaging for learners.
- There is a game-like atmosphere. There are elements of play, leveling up, and a sense of mastery or achievement during the instructional activities.
- The challenges are designed to be novel and create excitement and joy for learners.
- There is a healthy competition where the kids have to compete against one another.
- Learners don’t need to be graded about their performances as built-in consequences are natural.
- There is a natural building of social emotional skills – tolerance for frustration, expression of needs, working as a team.
- Lessons are interdisciplinary (like life) where multiple, cross-curricular content areas are integrated into the instructional activities.
These have been further discussed in A Model of Good Teaching?

The goals included the following:
- To work in a small group to create a Halloween scene using art work, LEDs, microcontrollers, servos, food items, and miscellaneous materials.
- To work as a small group to craft a story about their scene.
- To introduce and reinforce ideas, concepts, and skills associated with maker education, STEM, STEAM, and STREAM.
- To engage in a friendly team competition whereby collaboration in their small groups would lead to success in the competition.
Descriptions of the Individual Components
Science Related Activities and Standards
Learners did several activities that involved LED circuits (simple LED lights, LED Tea Light Spider Pumpkins, and Paper Circuit Skulls) and circuits with microcontrollers (see Technology section).
Science Standard:
- NGSS: 4-PS3-2. Make observations to provide evidence that energy can be transferred from place to place by sound, light, heat, and electric currents.
Technology Related Activities and Standards
For their displays, learners used servo socks to make parts of their display turn, micro:bits and servos to make milk carton robots, and Circuit Playground to make a flickering light to put inside their carved pumpkins. They needed to code their micro;bits and Circuit Playgrounds.
Computer Science Standards:
- 1B-CS-02 – Model how computer hardware and software work together as a system to accomplish tasks.
- 1B-AP-10 – Create programs that include sequences, events, loops, and conditionals
- 1B-CS-03 – Determine potential solutions to solve simple hardware and software problems using common troubleshooting strategies

wRiting – Language Arts Related Activities and Standards
Learners wrote stories that drove their displays. They did so in Google docs so they could write collaboratively. My “rule” was that they could only use elements in their displays that were part of their stories. This necessitated that they revisit their stories throughout this lesson.
ELA Standard:
- CCSS.ELA-LITERACY.W.5.3: Write narratives to develop real or imagined experiences or events using effective technique, descriptive details, and clear event sequences.
Example Stories:
Engineering Related Activities and Standards
Overall, engineering was used throughout this project from creating display artifacts – one student built a cardboard refrigerator with working parts and the milk carton robot to figuring out how to hang and arrange things on their display board.
NGSS Engineering Standards:
- 3-5-ETS1-1. Define a simple design problem reflecting a need or a want that includes specified criteria for success and
- constraints on materials, time, or cost.
- 3-5-ETS1-2. Generate and compare multiple possible solutions to a problem based on how well each is likely to meet the
- criteria and constraints of the problem.

Arts Related Activities and Standards
The entire display was an arts related activity, but I include a specific art activity, the Spooky Halloween 3D Art Project.
National Core Arts Standards:
- Anchor Standard #1. Generate and conceptualize artistic ideas and work.
- Anchor Standard #2. Organize and develop artistic ideas and work.
- Anchor Standard #3. Refine and complete artistic work.
Math Related Activities and Standards
Learners made their own Sugar Skulls and Gummy Legos (Bears) using recipes I projected on the Smartboard. They were asked to cut the recipes in half or thirds.
Math Standard:
- CCSS.MATH.CONTENT.5.NF.B.7: Apply and extend previous understandings of division to divide unit fractions by whole numbers and whole numbers by unit fractions.
It was so much fun to find and design these activities but it was even more fun watching the learners do them all. I can’t wait until next year!
My 2019 Highlights
The post describes my 2019 Highlights. I did this for four main reasons:
- We, especially as teachers, should spend more time reflecting on what we are doing well – our accomplishments. Often, we don’t get the recognition we deserve. Too often educators feel too timid or undeserving to publicly acknowledge their accomplishments believing that others will perceive them as braggarts. (Self-disclosure: I actually spend way too much time being critical of myself so this is actually really healthy for me to do.)
- I believe and include in the bio I share for conference presentations and PD consults that one of the major responsibilities of the modern day educator is to share resources, learning activities, thoughts, and insights with other educators. I do so through this blog and my Twitter account.
- I have a “nice box” which, for me, is actually a basket. It is where I put cards and gifts I have received from my students over the years. I tell my pre-service teachers to start one so that when they are feeling ineffective, challenged, or disillusioned, they can go to it for a boost. This post will act as a type of “nice box.”
- Finally, I am a strong proponent of being a reflective practitioner. For more about this, see Stephen Brookfield’s book, Becoming a Critically Reflective Teacher. Blogging, such as this post, is part of my reflective practice.
Here is my list.
I had a book on maker education published by ASCD.
I really love the maker movement. I have always had my students make things. As such, I was often seen as an outlier by the other teachers and principals at my schools. Now that it has become more mainstream, there is a much greater acceptance by my colleagues (and it helps that I now have an amazing and supportive principal). Words cannot describe how exciting I find this movement and hope it stands the test of time in our schools.
Writing this book took about two years but it fits with my mission of sharing resources, learning activities, and ideas with other educators. Given the amount of work it took, I am proud of this accomplishment. The description of the book is:
Transferring this innovative, collaborative, and creative mindset to the classroom is the goal of maker education. A makerspace isn’t about the latest tools and equipment. Rather, it’s about the learning experiences and opportunities provided to students. Maker education spaces can be as large as a school workshop with high-tech tools (e.g., 3D printers and laser cutters) or as small and low-tech as the corner of a classroom with bins of craft supplies. Ultimately, it’s about the mindset—not the “stuff.”
In Learning in the Making, Jackie Gerstein helps you plan, execute, facilitate, and reflect on maker experiences so both you and your students understand how the knowledge, skills, and attitudes of maker education transfer to real-world settings. She also shows how to seamlessly integrate these activities into your curriculum with intention and a clearly defined purpose (http://www.ascd.org/publications/books/119025.aspx).
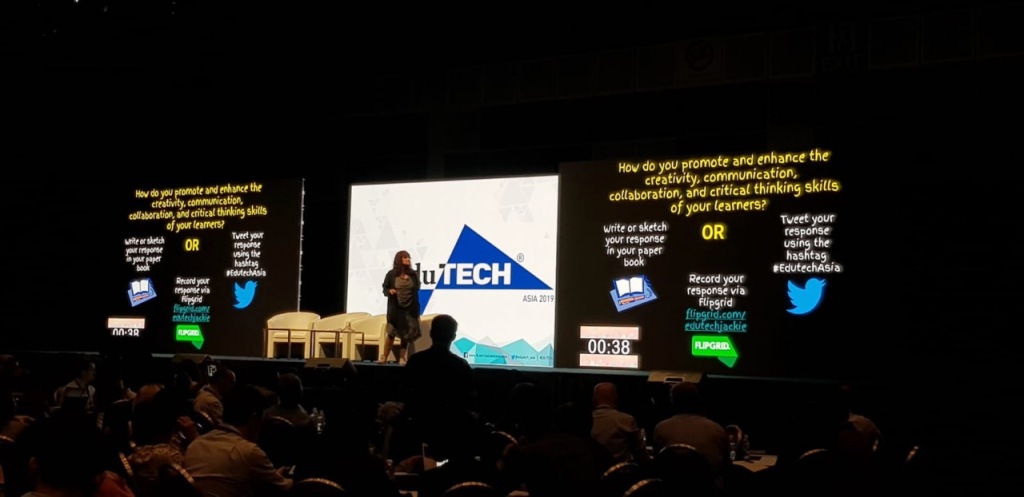
I keynoted and presented a workshop at Edutech Asia in Singapore.

I did a keynote in front of 1000+ people. Due to this anticipated audience size, I was worried about it for months. Because I focus on active participation, I asked them to make a one page book and then answer some reflection questions. It didn’t go over as well as I would have liked (yes, being self-critical) but I did something I feared. I also (re)learned I am a facilitator of experiences rather than a public speaker.
Slides from my keynote:
The final day I did a full day workshop. I was excited about having teachers and other professionals from Singapore, Thailand, Philippines, Cambodia, India, Malaysia, and New Zealand attend. This was way more successful – the participants being very engaged and excited. Here are the slides:
I did some very cool activities with my gifted students.
I love designing and implementing cross-curricular project-based learning with my gifted students, grades 3rd through 6th. Below are blog post links to some of my favorites from the 2018-19 school year.
Social Entrepreneurship
This is one of my favorites . . . ever. I am now in the process of doing it for a 3rd time with a current group of students. For more about this project, visit https://usergeneratededucation.wordpress.com/2018/05/13/elementary-social-entrepreneurship-a-perfect-steam-lesson/. Here is a video of a few of my students delivering raised monies to a local charity.
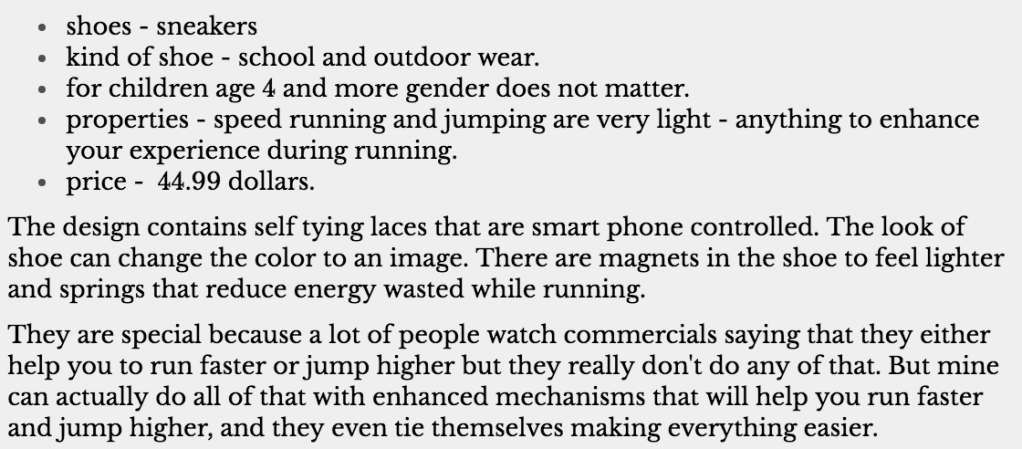
Design a Shoe
Game Jam: Designing a Video Game
I passed my ISTE Certification
ISTE Certification is a competency-based, vendor-neutral teacher certification based on the ISTE Standards for Educators. It recognizes educators who use edtech for learning in meaningful and transformative ways (https://www.iste.org/learn/iste-certification)
Doing the portfolio for the ISTE certification was a bear of a task. I worked on it for weeks for several hours a day during this past summer. I did enjoy the process of aggregating and discussing some of the edtech projects I have done.
Day of the Dead (Dia de los Muertos) Displays: A Maker Education Project

I have lived in Santa Fe, New Mexico for a few decades. One of my favorite things about living here is that my town celebrates and embraces Hispanic and Mexican cultural traditions. I have the privilege of working with gifted kids at two elementary schools with over 80% Hispanic students. For the past two years, I did Halloween Wars – based off of the Food Channel show. See Halloween Wars: An Interdisciplinary Lesson with a STEM, STEAM, Maker Education Focus for more about this. Because of the cultural heritage of my students and because I find the Day of the Dead holiday so intriguing and beautiful (the movie, Coco, helped bring its beauty to the masses), I decided to focus on having the students create Dia de los Muertos displays this year.
Standards Addressed
21st Century Skills
- Using 21st century skills to understand and address global issues
- Learning from and working collaboratively with individuals representing diverse cultures, religions and lifestyles in a spirit of mutual respect and open dialogue in personal, work and community contexts
- Understanding other nations and cultures, including the use of non-English languages
- Create new and worthwhile ideas (both incremental and radical concepts)
- Elaborate, refine, analyze and evaluate their own ideas in order to improve and maximize creative efforts
- Create new and worthwhile ideas (both incremental and radical concepts)
- Elaborate, refine, analyze and evaluate their own ideas in order to improve and maximize creative efforts
Next Generation Science Standards
- Define a simple design problem reflecting a need or a want that includes specified criteria for success and constraints on materials, time, or cost.
- Evaluate competing design solutions using a systematic process to determine how well they meet the criteria and constraints of the problem.
- Analyze and interpret data on the properties of substances before and after the substances interact to determine if a chemical reaction has occurred.
Common Core State Standards – ELA
- Write narratives to develop real or imagined experiences or events using effective technique, relevant descriptive details, and well-structured event sequences.
Getting Started – Gaining Attention
To introduce and show students the traditions related to Day of the Dead, they are shown the following videos:
-
Day of the Dead- Flavor and Tradition – https://www.youtube.com/watch?v=rdlL45ljkEY
-
What is Day of the Dead? | National Geographic – https://youtu.be/_sSawpU81cI
-
Dia de los Muertos (short film) – https://youtu.be/-v4-1wFEzM0
. . . as well as given time to explore the Smithsonian Latino Center’s Theater of the Dead – http://latino.si.edu/dayofthedead/ which includes an interactive element to build their own alter or Ofrenda.
Writing a Story About Day of the Dead
Students write a story with a Day of the Dead theme. They are given the option to write it alone or with a partner. Here is an example from one of my 6th grade students:
Artifacts for the Day of the Dead Displays
Students make the following artifacts and then, in small groups of three students, decide if and how they want to use them in their Day of the Dead displays to reflect the stories they wrote.
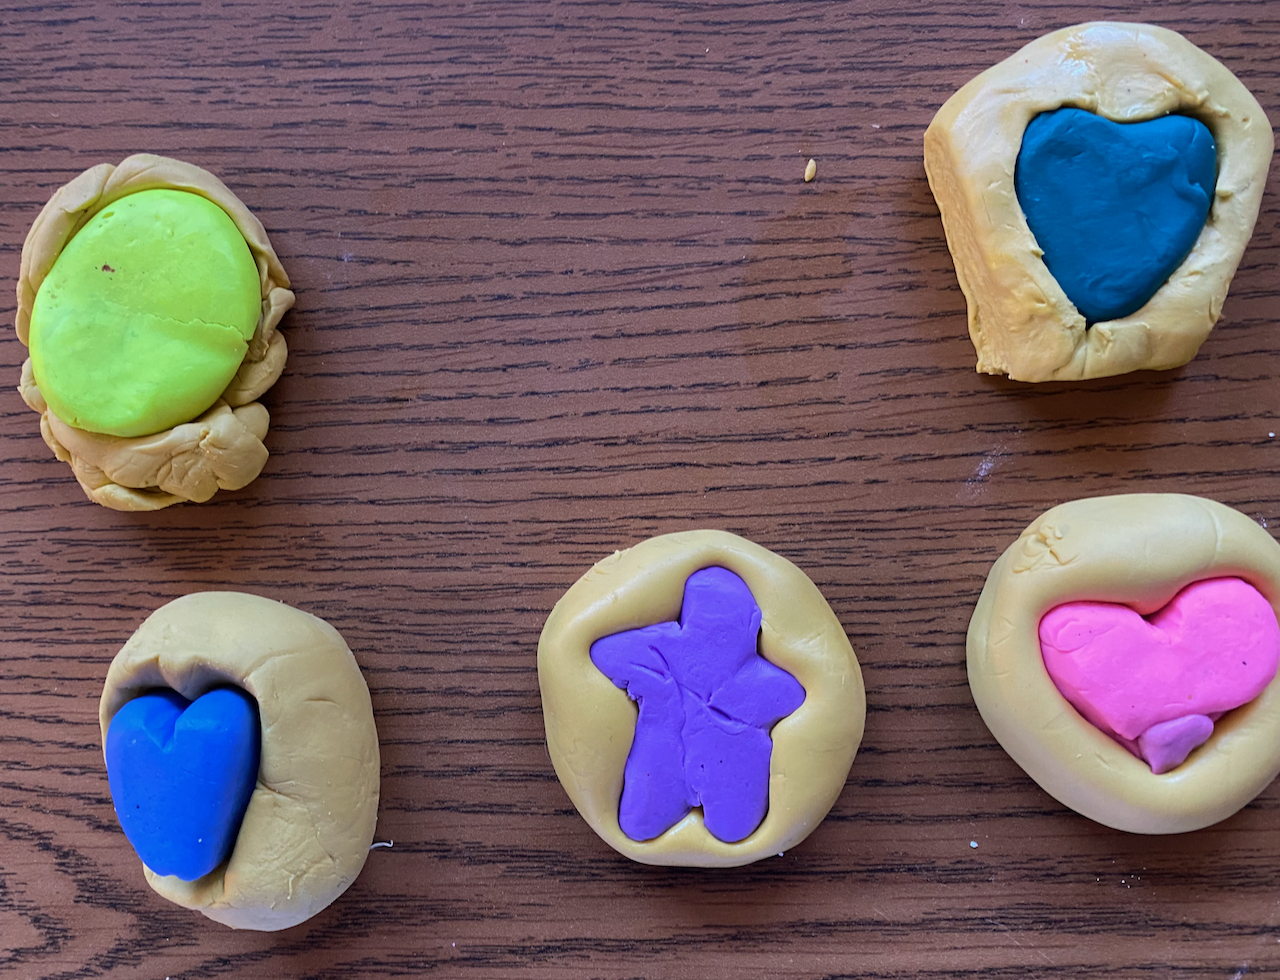
Decorated Skulls with Paper Circuits for Eyes
Materials: skull outline and parallel circuit outline (one for each student), 5MM LED lights, copper tape, coin batteries, transparent tape, markers.
Students decorate their paper skulls and then make parallel paper circuits to light up the eyes of these skulls. I found a template of a skeleton skull online. I printed these out – one for each student. I then made an outline of a parallel circuit so that when connected and joined with the top part, the LEDs would show up as pupils of the decorated skull – see below.
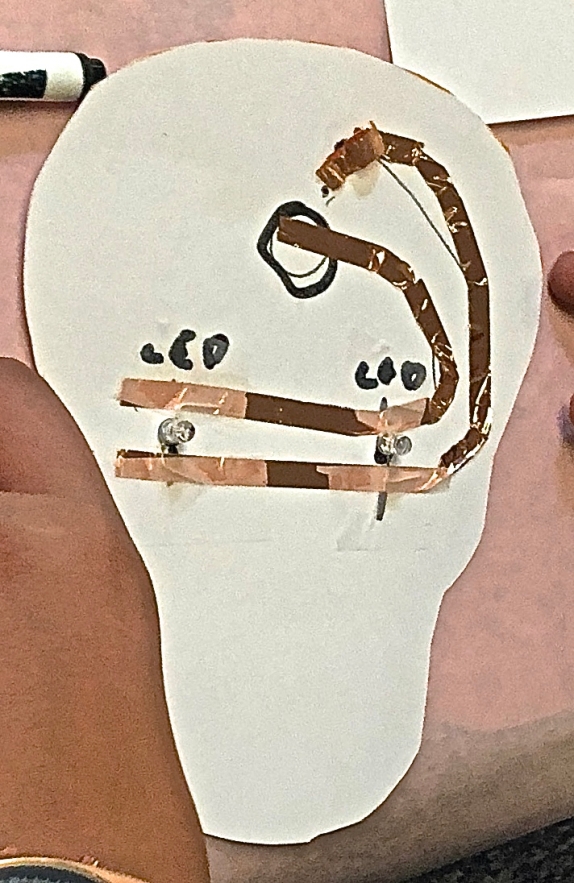

Students first cut out and decorate their skulls with markers. Images of decorated Day of the Dead skulls can be projected via a whiteboard so students can see examples. They then trace their cut out skulls onto the paper circuits template and cut that out. The bottom piece, containing the parallel circuit design, is then wired with the copper tape. The shorter copper tape is taped down from the battery placeholder to the end of its outline, so that the coin battery can be placed on top of that. For the longer piece of copper tape, about 1.5 inches is left at the end near the battery. This extra is folded onto itself so that after the battery is in place, this part of the copper tape can be taped on top of the battery. Having a folded over end piece makes it more manageable. Students should be reminded how to find the polarities of both the LEDs (the longer leg is positive) and the coin battery (it has a + on the top – that side with a little bit larger diameter). Students then tape their batteries and LEDs in place insuring that the positive legs of the LED lead to positive side of the battery and visa-versa. For more about paper circuits, see https://www.makerspaces.com/paper-circuits/. The LEDs are then poked through the eyes of the decorated skull. The top and bottom pieces are then stapled together.
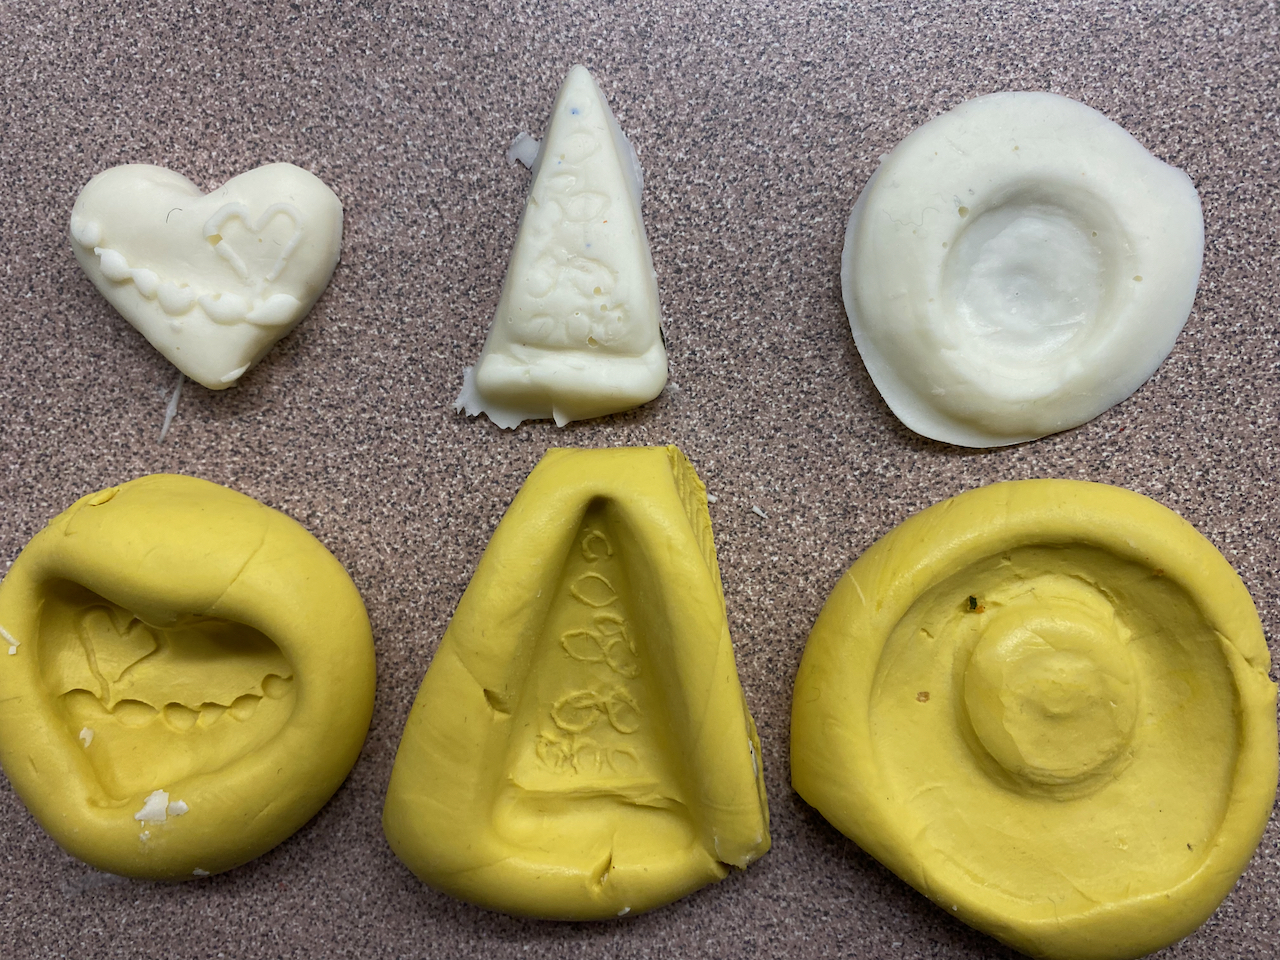
Sugar Skulls
Materials: sugar, meringue powder, sugar skull molds
Sugar skull molds can be purchased from https://www.mexicansugarskull.com/sugar_skulls/sugar-skull-molds.html. Sugar skulls are incredibly easy to make – just combining the dry ingredients of sugar and meringue power and adding a little water so it becomes the consistency of dampened beach sand. More directions along with amounts can be found at https://www.mexicansugarskull.com/sugar_skulls/instructions.html. After waiting at least 24 hours for the skulls to harden, students can then decorate them using edible markers or royal icing.


Skulls from Modeling Chocolate
Materials: white chocolate morsels, corn syrup.
This is another easy recipe to make (see http://artisancakecompany.com/recipe/how-to-make-perfect-modeling-chocolate/ for specific directions) although it is a bit tricky to get the modeling chocolate to the right consistency. Once the modeling chocolate is made, students sculpt it into 3D skulls.


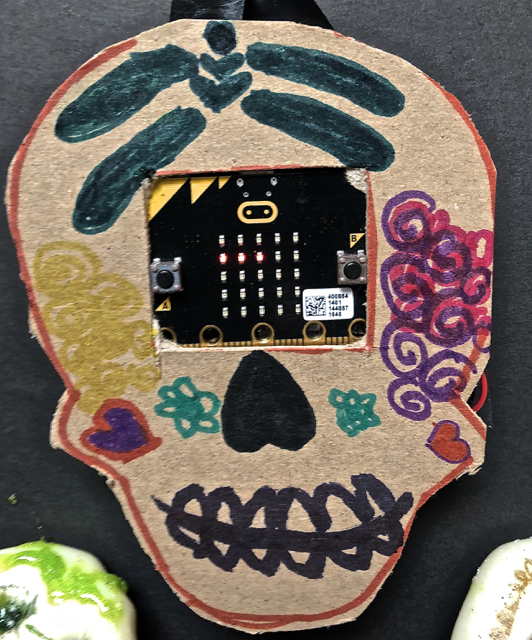
micro:bit Lit Skull
Materials: micro:bit (one for each team), heavy stock cardboard, (servos with jumper wires and alligator clips if movement is designed)
A micro:bit is mini-computer, half the size of a credit card equipped with 25 red LED lights that can flash messages. The micro:bit features an embedded compass, accelerometer, mobile, and web-based programming capabilities. It is compatible with a number of online code editors across a number of different languages (https://learn.sparkfun.com/tutorials/getting-started-with-the-microbit). For this activity, students cut out a skull with a window in the middle for the micro:bit (see below). They then use https://makecode.microbit.org/ to (1) create a message on the LEDs about Day of the Dead, and (2) code the servo to rotate the skull in a small arc from side to side (see https://sites.google.com/view/microbitofthings/7-motor-control/11-servo-control?authuser=0 for how to do this).

Tissue Paper Marigolds


Materials: yellow tissue paper, pipe cleaners.
The directions for how to make these can be found at https://tinkerlab.com/simple-paper-marigolds-dia-de-los-muertos/,
Edible Slime
Materials: sugar free Jello, starch
This is an easy recipe with the slime made by combining sugar free Jello, food starch, and water. Colors are determined by the flavor of the Jello – I like using lime for green slime and strawberry for red slime. For more information, visit https://thesoccermomblog.com/edible-silly-putty/
Miscellaneous Materials
Students are provided with core board and also given candy bones, candy gravestones, and chocolate animal crackers (to be crushed into dirt) so that these items along with the projects described above can be used for their displays, again reminding students that the displays should directly reflect their stories about Dead of the Day – Dia de los Muertos.
Student Reflection
Students were asked to randomly choose five cards from the deck of my Maker Reflection Cards to reflect on their experiences with this project. They were told that they could discard two of them but would need to answer three of them via a blog post, and I was totally elated when one asked if he could answer more – seven of them! Here are screenshots of his and another student’s reflections.


Cardboard Creations: A Maker Education Camp
This post discusses my Cardboard Creations Maker Education Camp that was taught to fifteen 5 to 12 year old learners for five days, 2.5 hours each morning during Summer, 2017. It is split into three sections:
- Rationale for Using No Tech, Minimal Cost Materials
- Some Pedagogical Perspectives
- Summer Maker Education Camp Project
Rationale for Using No Tech, Minimal Cost Materials
Cardboard Creations Maker Education Camp utilized no technology (except for projecting images of example projects on the whiteboard) and low/no cost materials. Many of the discussions about and actions related to integrating maker education into educational environments center around the use of new technologies such computer components (Raspberry Pis, Arduinos), interactive robots for kids (Dash and Dot, Ozobots, Spheros), and 3D printers. These technologies are lots of fun and I facilitate Robotics and Computer Science with my gifted students and at one of my summer camps. The learners engaged in these high tech learning activities with high excitement and motivation. Such high excitement, engagement and motivation, though, were also seen at my low tech/low cost maker education camps: LED crafts, Toy Hacking and Making, and Cardboard Creations.
As a recent NPR article discussed several challenges for maker education. One of them was related to equity issues, providing maker education for all students regardless of income level:
A big challenge for maker education: making it not just the purview mostly of middle- and upper-middle-class white kids and white teachers whose schools can afford laser cutters, drones or 3-D printers (3 Challenges As Hands-On, DIY Culture Moves Into Schools).
In order to adequately address this challenge, it becomes important to speak of making in broader terms; that maker education is so much more than 3D printing, drones, and robots. As Adam Savage from Mythbusters notes:
What is making? It is a term for an old thing, it is a new term for an old thing. Let me be really clear, making is not simply 3D printing, Art Lino, Raspberry Pi, LEDs, robots, laser and vinyl cutters. It’s not simply carpentry and welding and sculpting and duct tape and drones. Making is also writing and dance and filmmaking and singing and photography and cosplay. Every single time you make something from you that didn’t exist in the world, you are making. Making is important; it’s empowering. It is invigorating (Adam Savage’s 2016 Bay Area Maker Faire Talk).
Doing and promoting maker experiences such as cardboard projects have the potential to offset the challenges associated with access and costs as well as provide opportunities for making by all.
Cardboard, my makerspace material of choice, is available in every home in America. From mac and cheese boxes to a shoebox, cardboard is a material that puts students on a level playing field. It’s free. Students can cut thin stuff with scissors or score corrugated material with a pair of safety scissors, and tape is cheap enough that I can send a partial roll home with a student who needs it. Kids in families who cannot afford clay or craft kits or have little money for additional classroom supplies can still imagine something using materials that belong to them. That equals the playing field among students who ‘have not’ with students who ‘have’ adequate resources (Cardboard Creators: Reusing to Learn).
Some Pedagogical Perspectives
The Experiential Nature of Maker Activities Makes Them Messy, Loud, and Chaotic
Traditional classrooms are often marked by students quietly at their desks completing the same tasks at the same time. This is opposite of what went on during the Cardboard Creations Maker Education camp. The classroom was loud, seemingly chaotic and messy. Cutting and working with cardboard creates a mess, but authentic and engaged learning is often messy.
Learning is often a messy business. “Messy” learning is part trial and error, part waiting and waiting for something to happen, part excitement in discovery, part trying things in a very controlled, very step by step fashion, part trying anything you can think of no matter how preposterous it might seem, part excruciating frustration and part the most fun you’ll ever have. Time can seem to stand still – or seem to go by in a flash. It is not unusual at all for messy learning to be …um …messy! But the best part of messy learning is that besides staining your clothes, or the carpet, or the classroom sink in ways that are very difficult to get out … it is also difficult to get out of your memory! (http://www.learningismessy.com/quotes/)
Concepts and Skills Naturally Embedded in a Context
Concepts and skills became embedded in the experiential activities. Learning of concepts and skills occurred at the time when the campers’ interest and need were the highest. For example, when the learners did their solar ovens, several concepts were introduced and talked about: direction of sun rays, solar energy, angle of lean. These discussions and knowledge helped them to better their design and set up their solar ovens. Their learning had a context and a reason.
The same was true for the the learning of skills. Learners were motivated and attentive when I demonstrated certain cardboard folding and connecting techniques. This also included soft skills such as communicating needs, asking for what they needed, and collaborating with others as they found a genuine need and desire to use them.
The Cardboard Box as a Blank Palette
Many of kids’ toys are promoted and sold with directions, solutions to problems, and expectations for end products.
Unfortunately for kids today, the designed world doesn’t leave much room for them to explore. Most toys come with pre-defined identities and stories, which rob children of the joy of imagining these things. This leaves few opportunities to figure out how to use a toy, experiment, fail, and invent the story of where it came from, and why it does what it does. Imagining, understanding, and becoming who we are is a process informed by play, and both toy companies and designers are taking all the exploration out of it (The Case For Letting Kids Design Their Own Play).
The cardboard box becomes a blank palette waiting for a kid’s imagination to make it into come alive especially in the mind of that kid. Making with cardboard doesn’t come with a set of step-by-step instructions about what and how to make. This is beautifully illustrated by the following short film.
Summer Maker Education Camp Projects
What follows are the projects that the campers did during the cardboard creation camp
Knight Costumes and Capture the Flag
The campers made shields, swords, helmets and then played Capture the Flag . I got this idea from http://www.instructables.com/id/Cardboard-Fortress-Battle-capture-the-flag/. Given the elementary age level, I cut out the shields and sword handles for them.
Solar Ovens for Smores
Campers made solar ovens for Smores which was an easy, high engagement cardboard activity for them to learn about and explore solar energy. There are lots of tutorials on the Internet about how to make these. Here is one of them: http://desertchica.com/diy-solar-oven-smores-kids-science-experiment/.
Photo Face-in-the-Hole
The materials for this activity were simply big pieces of cardboard and poster paints. Kids were given the task to make a photo face-in-the-hole. What they created can be viewed in the following slideshow.
Cardboard Box Foosball
Directions on how to make the cardboard box Foosball can be found at: http://www.muminthemadhouse.com/shoebox-table-football-foosball/. I cut the goal areas out for the campers ahead of time. They poked the holes for the dowels using the pointy end of the Makedo Safe-Saw.
Miniature Golf Course Holes
For this cardboard creation, I gave campers a long piece of card, a kid golf club and golf ball (bought at https://www.carnivalsource.com/store/p/194472-One-Set-Golf-Set/10-Pc.html) and had available toilet paper/paper towel rolls, pool noodles, small cardboard boxes for them to each make their own miniature golf course hole. When completed they were placed on the playground’s grassy area to make a miniature golf course.
Hot Wheel Car Tracks and Garages
For our last day, each camper was given a hot wheels car and told to create anything for that car using all of the left over boxes, duct tape, and Makedo screws. Most created tracks but a few created garages. This was equally engaging for the boys and for the girls.
Here is a link to my blog post that includes the cardboard challenge projects from summer, 2016: https://usergeneratededucation.wordpress.com/2016/07/25/cardboard-challenges-no-techlow-cost-maker-education/. My cardboard creations webpage of resources and project ideas can be found at http://www.makereducation.com/cardboard-challenge.html.
A Perfect Storm for Maker Education
Originally published at http://blog.iat.com/2015/09/30/a-perfect-storm-for-maker-education/.

https://www.thinglink.com/scene/575147870160683008
Perfect Storm: an expression that describes an event where a rare combination of circumstances will aggravate a situation drastically. The term is also used to describe an actual phenomenon that happens to occur in such a confluence, resulting in an event of unusual magnitude.
Maker Movement:
The maker movement, as we know, is the umbrella term for independent inventors, designers and tinkerers, a convergence of computer hackers and traditional artisans. Makers tap into an American admiration for self-reliance and combine that with open-source learning, contemporary design and powerful personal technology like 3-D printers. The creations, born in cluttered local workshops and bedroom offices, stir the imaginations of consumers numbed by generic, mass-produced, made-in–China merchandise. (Why the Maker Movement Is Important to America’s Future)
A movement made up of hobbyists, tinkerers, crafters and innovators is getting ready to change what you thought you knew about the American economy. They’re teaching a new generation how to repair rather than replace, and if what they’re looking for is not available, to invent it. They call themselves “makers,” and they will figure out how to build whatever you can imagine. (The Maker Movement Is About the Economy, Stupid)
There currently exists the conditions for a perfect storm for maker education due to:
- The Do It Yourself (DIY) Movement
- Focus on STEM and STEAM Education
- Information Access and Information Abundance
- Affordable Maker Technologies
- Crowdsourcing and Participatory Culture
- Open Source Resources
The Do It Yourself (DIY) Movement
Do It Yourself, or DIY, is a term that is used by various communities of practice that focus on people creating things for themselves without the aid of a paid professional. embers of these subcultures strive to blur the lines between creator and consumer by constructing a social network that ties users and makers close together. The phrase Do It Yourself along with its acronym is also commonly used where a layman endeavors to complete a project without the physical aid of a paid professional. http://72.9.148.189/library/D.I.Y.
What this means for young people is that they are growing up in DIY cultures, where they have role models who engage in DIY and where they have 24-7 access to information and technological resources. For example, younger makers can turn to DIY, a safe online community for kids to discover and learn new skills. Older makers can use Make: DIY Projects for inspiration, ideas, and how-tos.
Focus on STEM and STEAM Education
One of President Obama’s initiatives has been a call to action for making STEM (science, technology, engineering, mathematics) education a priority in the United States. He emphasized the need to broaden participation to those groups who typically do not engage in STEM initiatives:
President Obama knows that we simply cannot, as a Nation, expect to maintain our run of ingenuity and innovation—we cannot maintain that stream of new and different ideas—if we do not broaden participation in STEM to all Americans, including women and girls and minorities. (Educate to Innovate)
Some professionals and practitioners are expanding STEM education to include the arts which translates in STEAM education.
In this climate of economic uncertainty, America is once again turning to innovation as the way to ensure a prosperous future. Yet innovation remains tightly coupled with Science, Technology, Engineering and Math – the STEM subjects. Art + Design are poised to transform our economy in the 21st century just as science and technology did in the last century. (STEM to STEAM)
Maker education can be a gateway to STEM involvement by students who may not have had interest in the science, technology, engineering, and math disciplines in the past.
At a time when many people are asking how we can get more students interested in STEM fields, we are hearing from teachers who have found making to be a great way to get students excited and engaged in their classrooms. We are seeing making occurring in subject classes such as math or science — in classes specifically listed as maker classes — and in a variety of less formal settings such as clubs and study halls. Many of these projects incorporate a variety of STEM topics. Students working on designing and building furniture for their classroom use algebra and geometry to figure out the dimensions. E-textiles and soft circuitry, in which circuits are sewn using conductive thread or fabric, have shown to be an engaging way to teach electronics and programming, especially for young women. The possibilities for ways to incorporate making into the school day are endless, and it is exciting to see what teachers have been developing and sharing. (Engaging Students in the STEM Classroom Through “Making”)
Information Access and Abundance
We are living in one of the most exciting times in the history of humankind. Our world in now filled with information abundance, surplus, and access. The result is synergy whereby the human mind plus our current technologies far exceed the sum of these individual parts. We have technologies to access any type of information and to create products that match the pictures and voices in our minds; and we can use technology to get the assistance and feedback from folks around the globe. (Information Abundance and Its Implications for Education)
Anyone with access to the Internet has access to all kinds of information, resources, and tutorials. Young people are used to going online to find information and how-to tutorials via YouTube, Wikipedia, and their social networks. Young makers have taken advantage of this easy and free access information to make valuable contributions to our world. For example, Jack Andraka, who as a High School sophomore, discovered a test for pancreatic cancer through reading science research he found online. Katherine Wu, a ninth-grader, invented “the driver’s companion,” a device that could monitor drivers’ blinks and brain waves to see if they were in danger of falling asleep at the wheel. She studied neuroscience to find out how to identify signs of sleepiness, took an online course to learn how to create the computer code that would recognize those signs. (Local teens’ inventions impress scientists)
Affordable Maker Technologies

Accessibility of affordable maker technologies (e.g., 3D Printers, DIY computer devices) is due, in part to the democratization of these technologies.
When something is democratized it means that it is accessible to everyone. When used in the context of the maker movement, ‘democratization’ refers to the decreasing cost of the tools and technologies credited with spurring the movement. The cost of 3D printers, laser cutters, CNC machines, and 3D scanners has dramatically decreased over the past five years. (Democratized tools of production: New technologies spurring the maker movement)
Today, the availability of affordable constructive technology and the ability to share online has fueled the latest evolutionary spurt in this facet of human development. New tools that enable hands-on learning — 3D printers, robotics, microprocessors, wearable computers, e-textiles, “smart” materials and new programming languages — are giving individuals the power to invent. (The maker movement: A learning revolution)
Maker technologies such as Makey-Makey, littleBits, Arduinos, 3D Printers, and robotics kits provide opportunities for learners to experiment and invent for themselves. They are accessible and usable by a wide range of skill and age levels; and even though there is a cost attached to them, they are more accessible to those with less financial means than similar technologies had been in the past. There does, though, need to be a continued dialogue and proactive efforts to create a maker culture of accessibility.
If the rise of the maker movement and these new tools for democratized production are going to create opportunity, how do we ensure that all people truly have access and training? It is essential to understand and address the social structures and identity categories that are inherent in the maker movement before the tools of production that play such a prominent role are truly democratized. (Democratized tools of production: New technologies spurring the maker movement)
If one of the characteristics of the maker movement is democratization of related tools, software, and techniques, then efforts need to focus on the education institutions that serve children (school, libraries, museums, after-school programs) especially underrepresented and underserved children. We need to insure that there is little or no gap between those of means and those with little means when it comes to maker education. Dr. David A. Williams (SVP of Program, Training & Youth Development at Boys and Girls Club of America) has tackled this head-on at BGCA (Tackling the Digital Divide & Closing the Opportunity Gap in STEM Education) and so has Congressman Joe Kennedy in Boston (Do Politicians Really Care About STEM Education?).
Crowdsourcing and Participatory Culture
The maker movement and makerspaces are that they are driven by principles of crowdsourcing and participatory cultures. Makers, as a group, freely share their makes so others can replicate and/or improve upon them.
Many maker movement initiatives are rooted in the idea of a “Participatory Culture,” a term coined by American media scholar Henry Jenkins. Henry Jenkins recognizes the key elements of a participatory culture to include low barriers to expression and engagement, strong support for creating and sharing one’s creations with others, and some type of informal mentorship whereby what is known by the most experienced is passed along to novices. (Worlds of Making: Best Practices for Establishing a Makerspace for Your School By Laura Fleming)
And as Dale Dougherty (@dalepd), considered by many as the father of the maker movement, stated in the Maker Mindset:
The Maker Movement is spurred by [….] the increasing participation of all kinds of people in interconnected communities, defined by interests and skills online as well as hyper-local efforts to convene those who share common goals. (Dougherty, The Maker Mindset, 2013)
Massimo Banzi (@mbanzi), the inventor of the highly popular maker technology Arduino, noted how a participatory maker culture spurs creativity.
Whenever you design a tool that allows people to be creative, there are people who will start to be creative with the tool. Once we made that available, people are now responding and creating. So it’s not so much that we’ve become a world of people who do hardware hacking, but, I guess, a world where people are becoming more involved in the creation of products. (Arduino’s Massimo Banzi: How We Helped Make The Maker Movement)
Related to crowdsourcing is crowdfunding which, as it implies, is asking the public to fund some worthwhile causes. Crowdfunding sites like Donors Choose can help educators get maker materials for their classrooms, increasing the chances that underfunded classrooms can get the tools and materials related to the maker movement.
Open Source Resources
Open source software is software that can be freely used, changed, and shared (in modified or unmodified form) by anyone. Open source software is made by many people, and distributed under licenses that comply with the Open Source Definition.
Makers often share their “makes” so other can reproduce them and/or improve upon them. For example, Markerbot’s Thingiverse is probably one of the biggest online repositories of open source 3D designs. A quick perusal of the website shows designs everything from prosthetic devices to footwear to toys.
The sharing culture that marks the maker movement carries over into maker technology companies in that they often make their software and hardware open source. Popular educational maker hardware such as Arduinos and lillteBits are open source:
Open-source hardware shares much of the principles and approach of free and open-source software. In particular, we believe that people should be able to study our hardware to understand how it works, make changes to it, and share those changes. To facilitate this, we release all of the original design files (Eagle CAD) for the Arduino hardware. These files are licensed under a Creative Commons Attribution Share-Alike license, which allows for both personal and commercial derivative works, as long as they credit Arduino and release their designs under the same license. (Arduinos FAQ)
littleBits has the following to say about developing open source hardware:
Open Source Hardware means that we make the design files available for the circuit designs in our modules pursuant to the CERN Open Hardware License Version 1.2. It makes sense for us because littleBits products are a teaching tool: sharing our designs allows for the possibility of teaching how these circuit designs work down to a circuit level. (What does Open Source mean?)
The bottom line is that educators both in formal and informal settings would be foolish not to take advantage of this perfect storm of maker education resources, tools, and strategies that currently exist.

