Posts Tagged ‘English Language Arts’
Stop Motion Animations: A Fun and Engaging Language Arts-Educational Technology Integration
One of my favorite things to do as an educator is to create lessons plans that help students address content standards through authentic learning activities and develop transferrable skills. For the stop motion animations, both English Language Arts Common Core and ISTE Standards were addressed. Plus, students had fun, were fully engaged, and developed a greater tolerance for long term projects. This blog post provides some background information as well as presents a few student examples.
Standards Addressed
English Language Arts Common Core Standards
CCSS.ELA-LITERACY.W.5.3
Write narratives to develop real or imagined experiences or events using effective technique, descriptive details, and clear event sequences.
- CCSS.ELA-LITERACY.W.5.3.A
Orient the reader by establishing a situation and introducing a narrator and/or characters; organize an event sequence that unfolds naturally. - CCSS.ELA-LITERACY.W.5.3.B
Use narrative techniques, such as dialogue, description, and pacing, to develop experiences and events or show the responses of characters to situations. - CCSS.ELA-LITERACY.W.5.3.E
Provide a conclusion that follows from the narrated experiences or events.
ISTE (Technology) Standards for Students
1.6. Creative Communicator
Students communicate clearly and express themselves creatively for a variety of purposes using the platforms, tools, styles, formats and digital media appropriate to their goals. Students:
- 1.6.b. create original works or responsibly repurpose or remix digital resources into new creations.
- 1.6.c. communicate complex ideas clearly and effectively by creating or using a variety of digital objects such as visualizations, models or simulations.
- 1.6.d. publish or present content that customizes the message and medium for their intended audiences.
Creating Storyboards
Learners were assigned the following story arc template in Storyboard That.
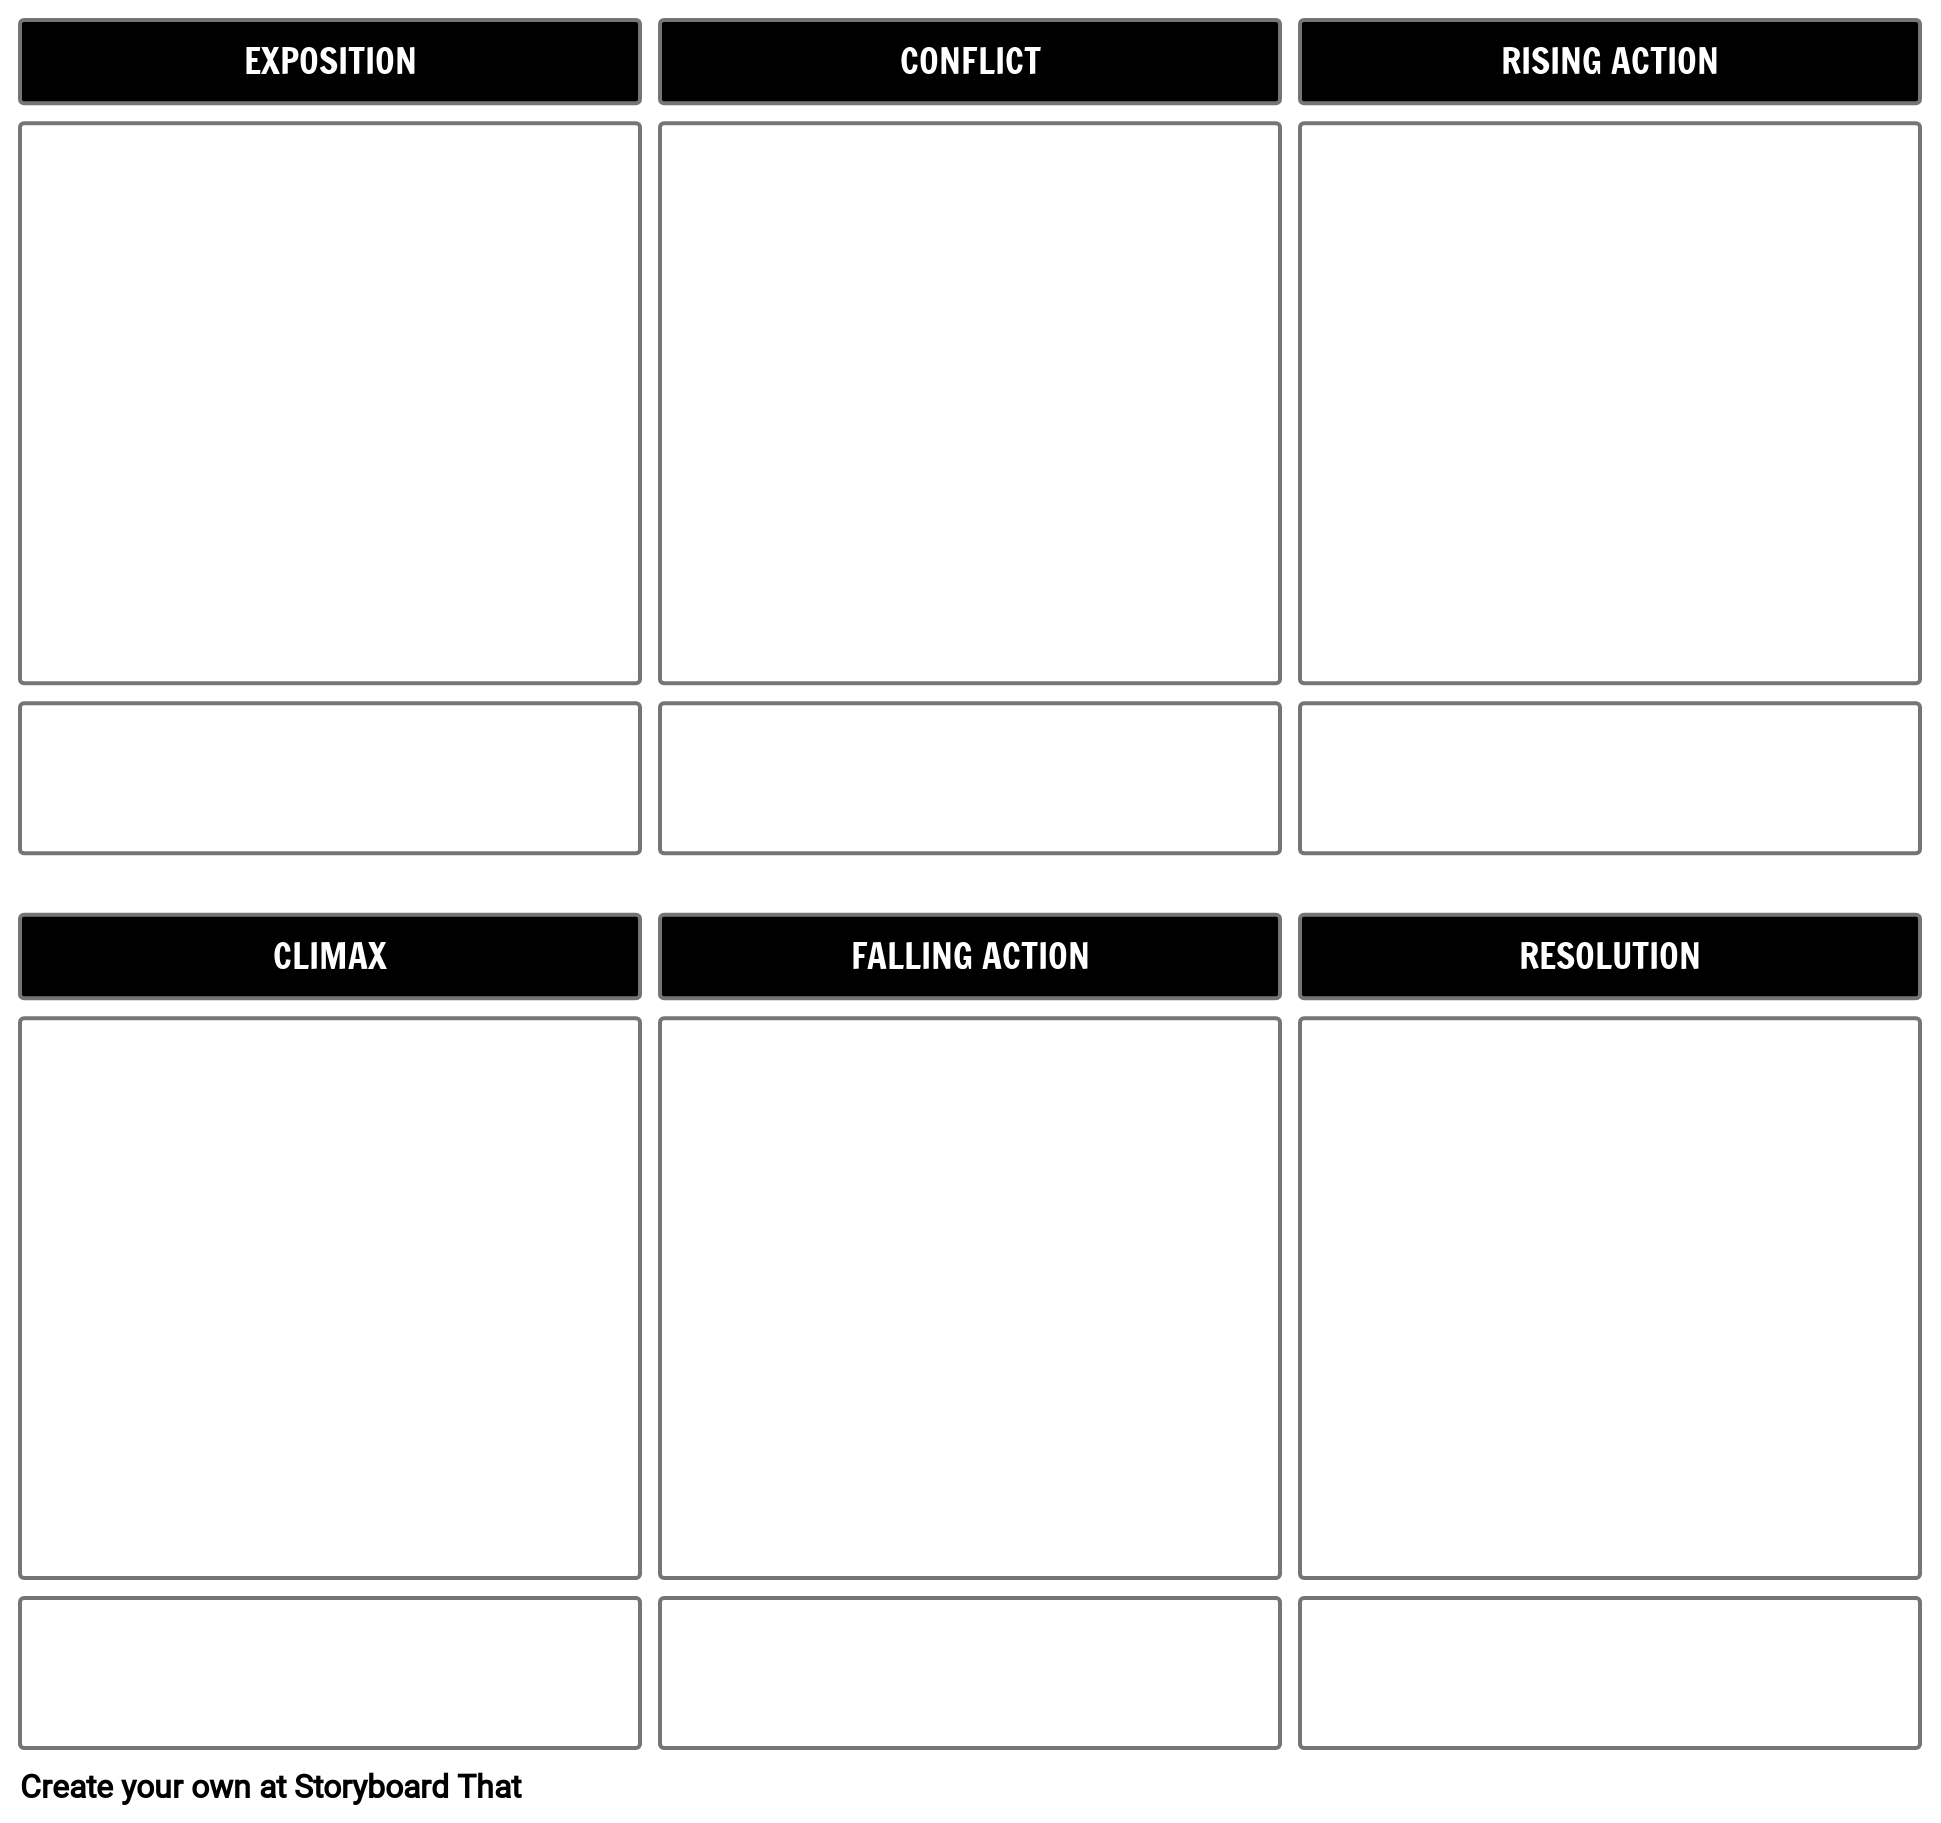
Link – https://www.storyboardthat.com/create/storytelling-templates
Making the Stop Motion Animations
Learners used the Stop Motion Studio App to create their animations:
Student Examples
The Worm and the Cheese by Andrew
Storyboard Template Using Storyboard That
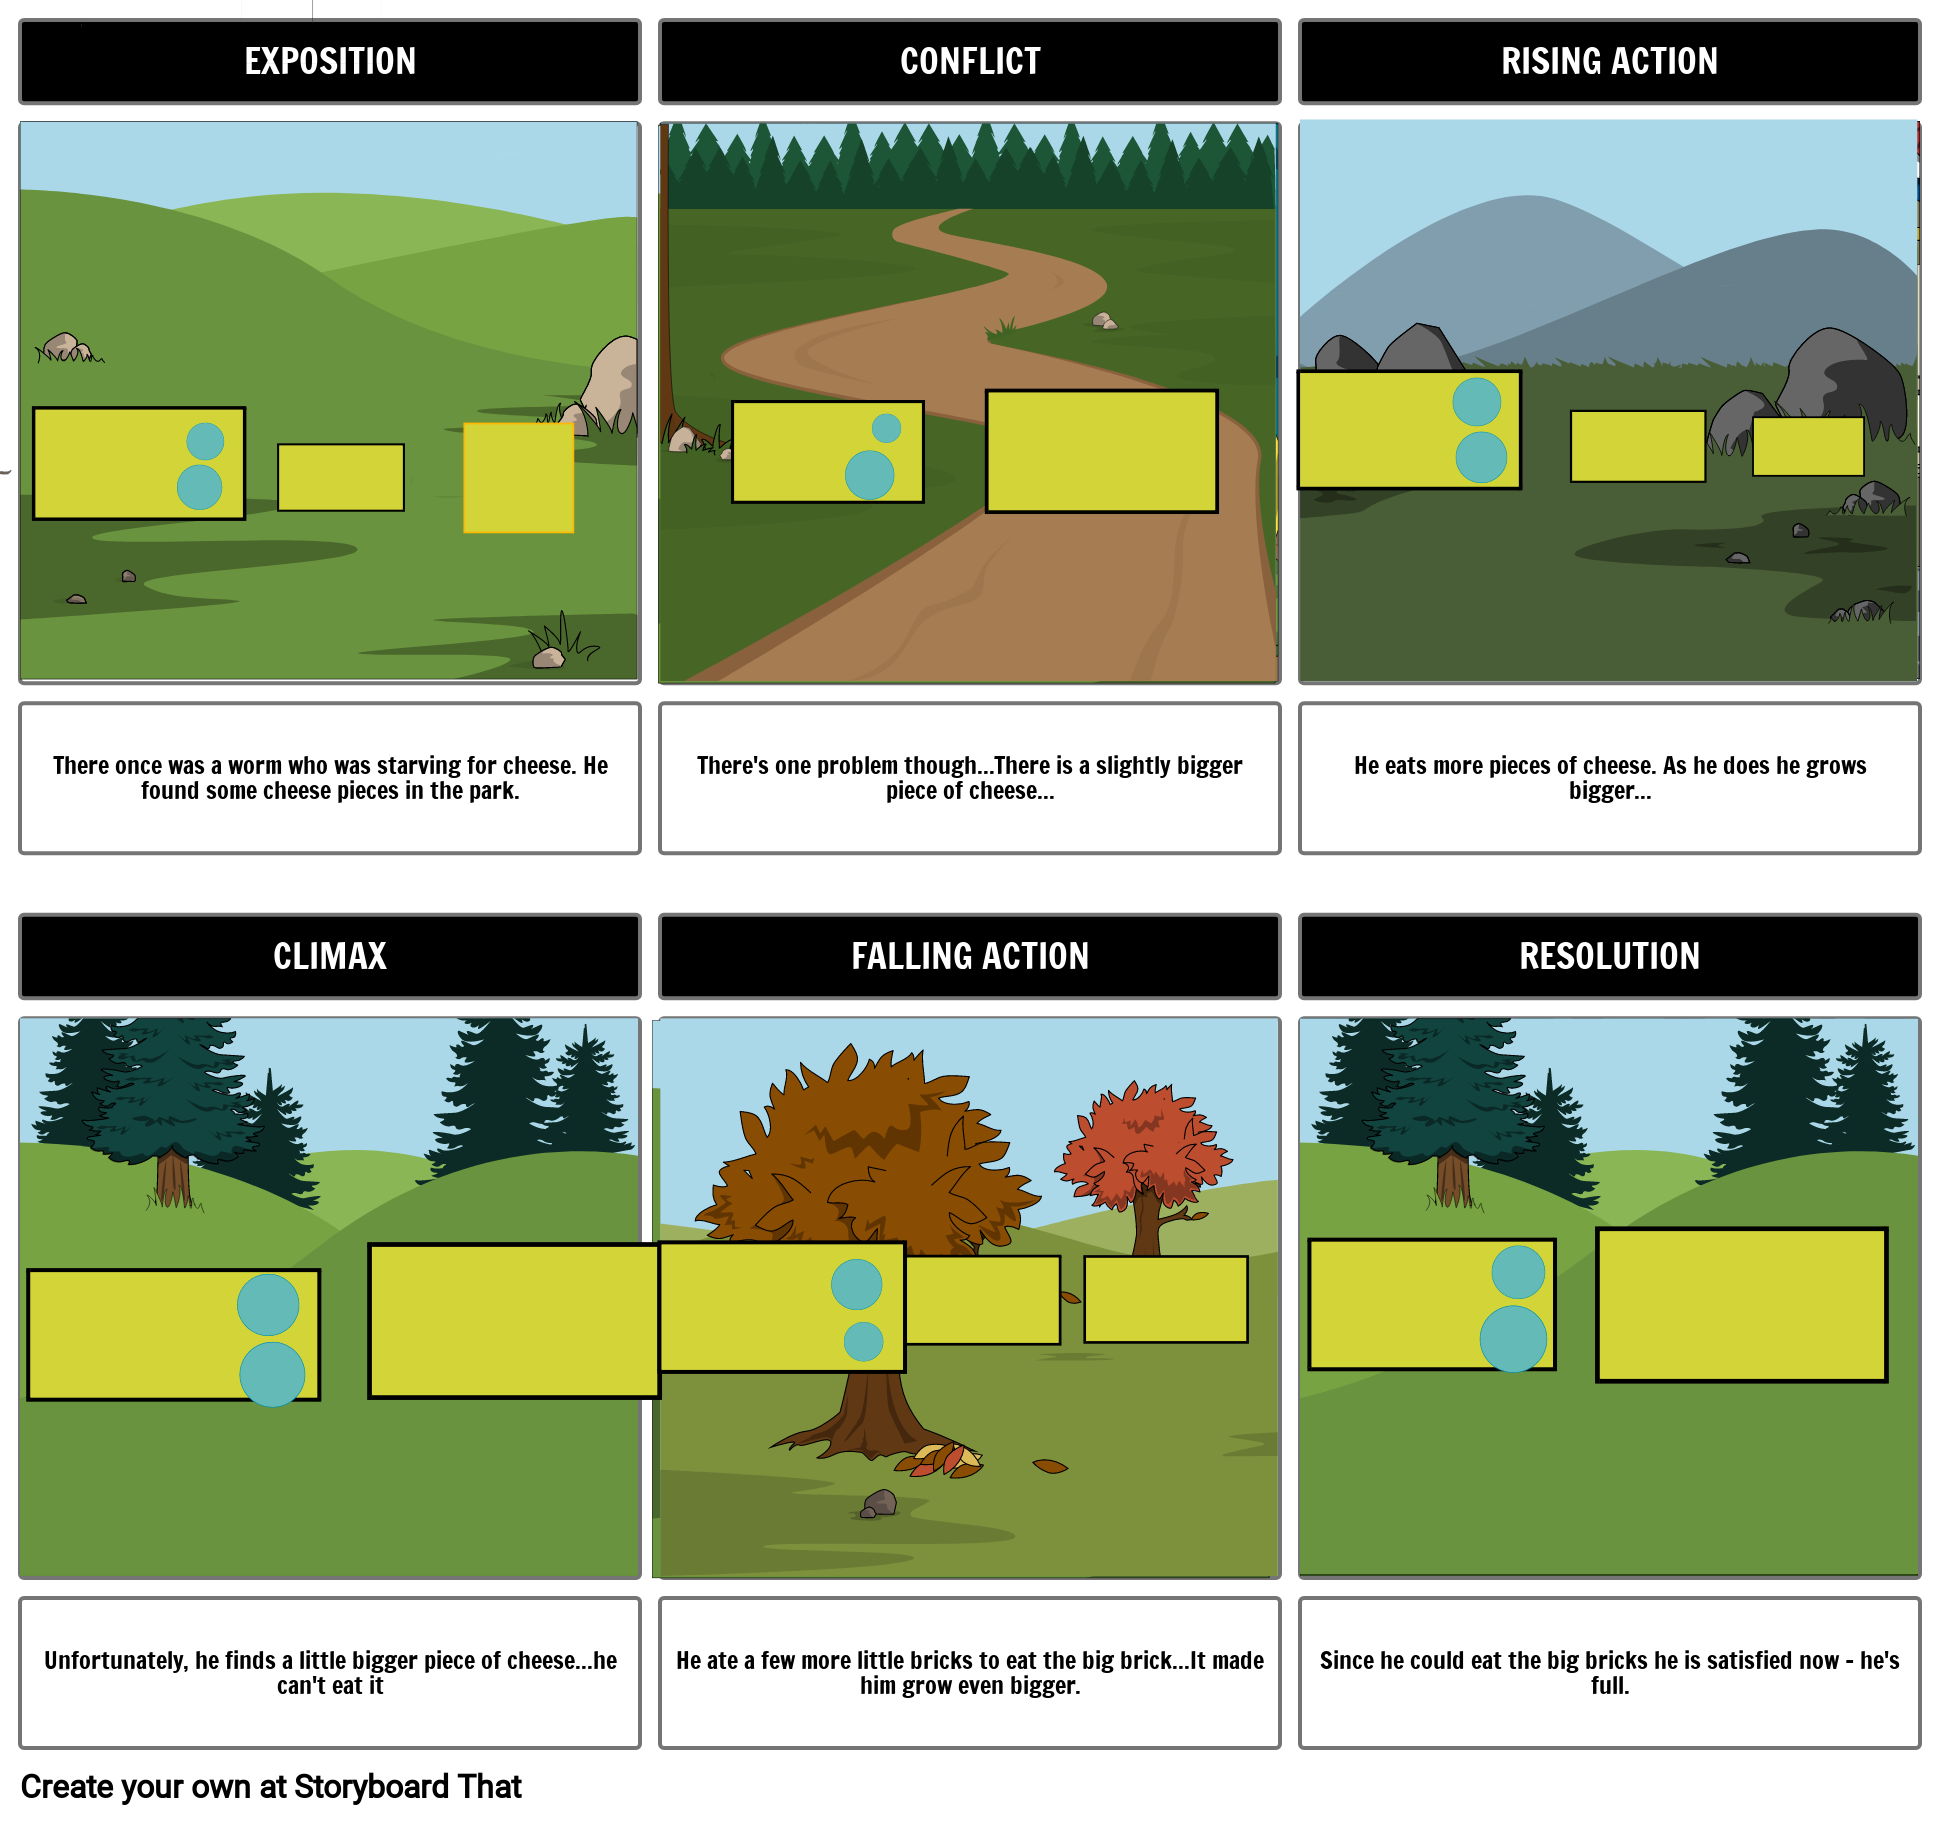
Stop Motion Animation: The Worm and the Cheese
The Adventure of the Cats by Marisol
Storyboard Template Using Storyboard That
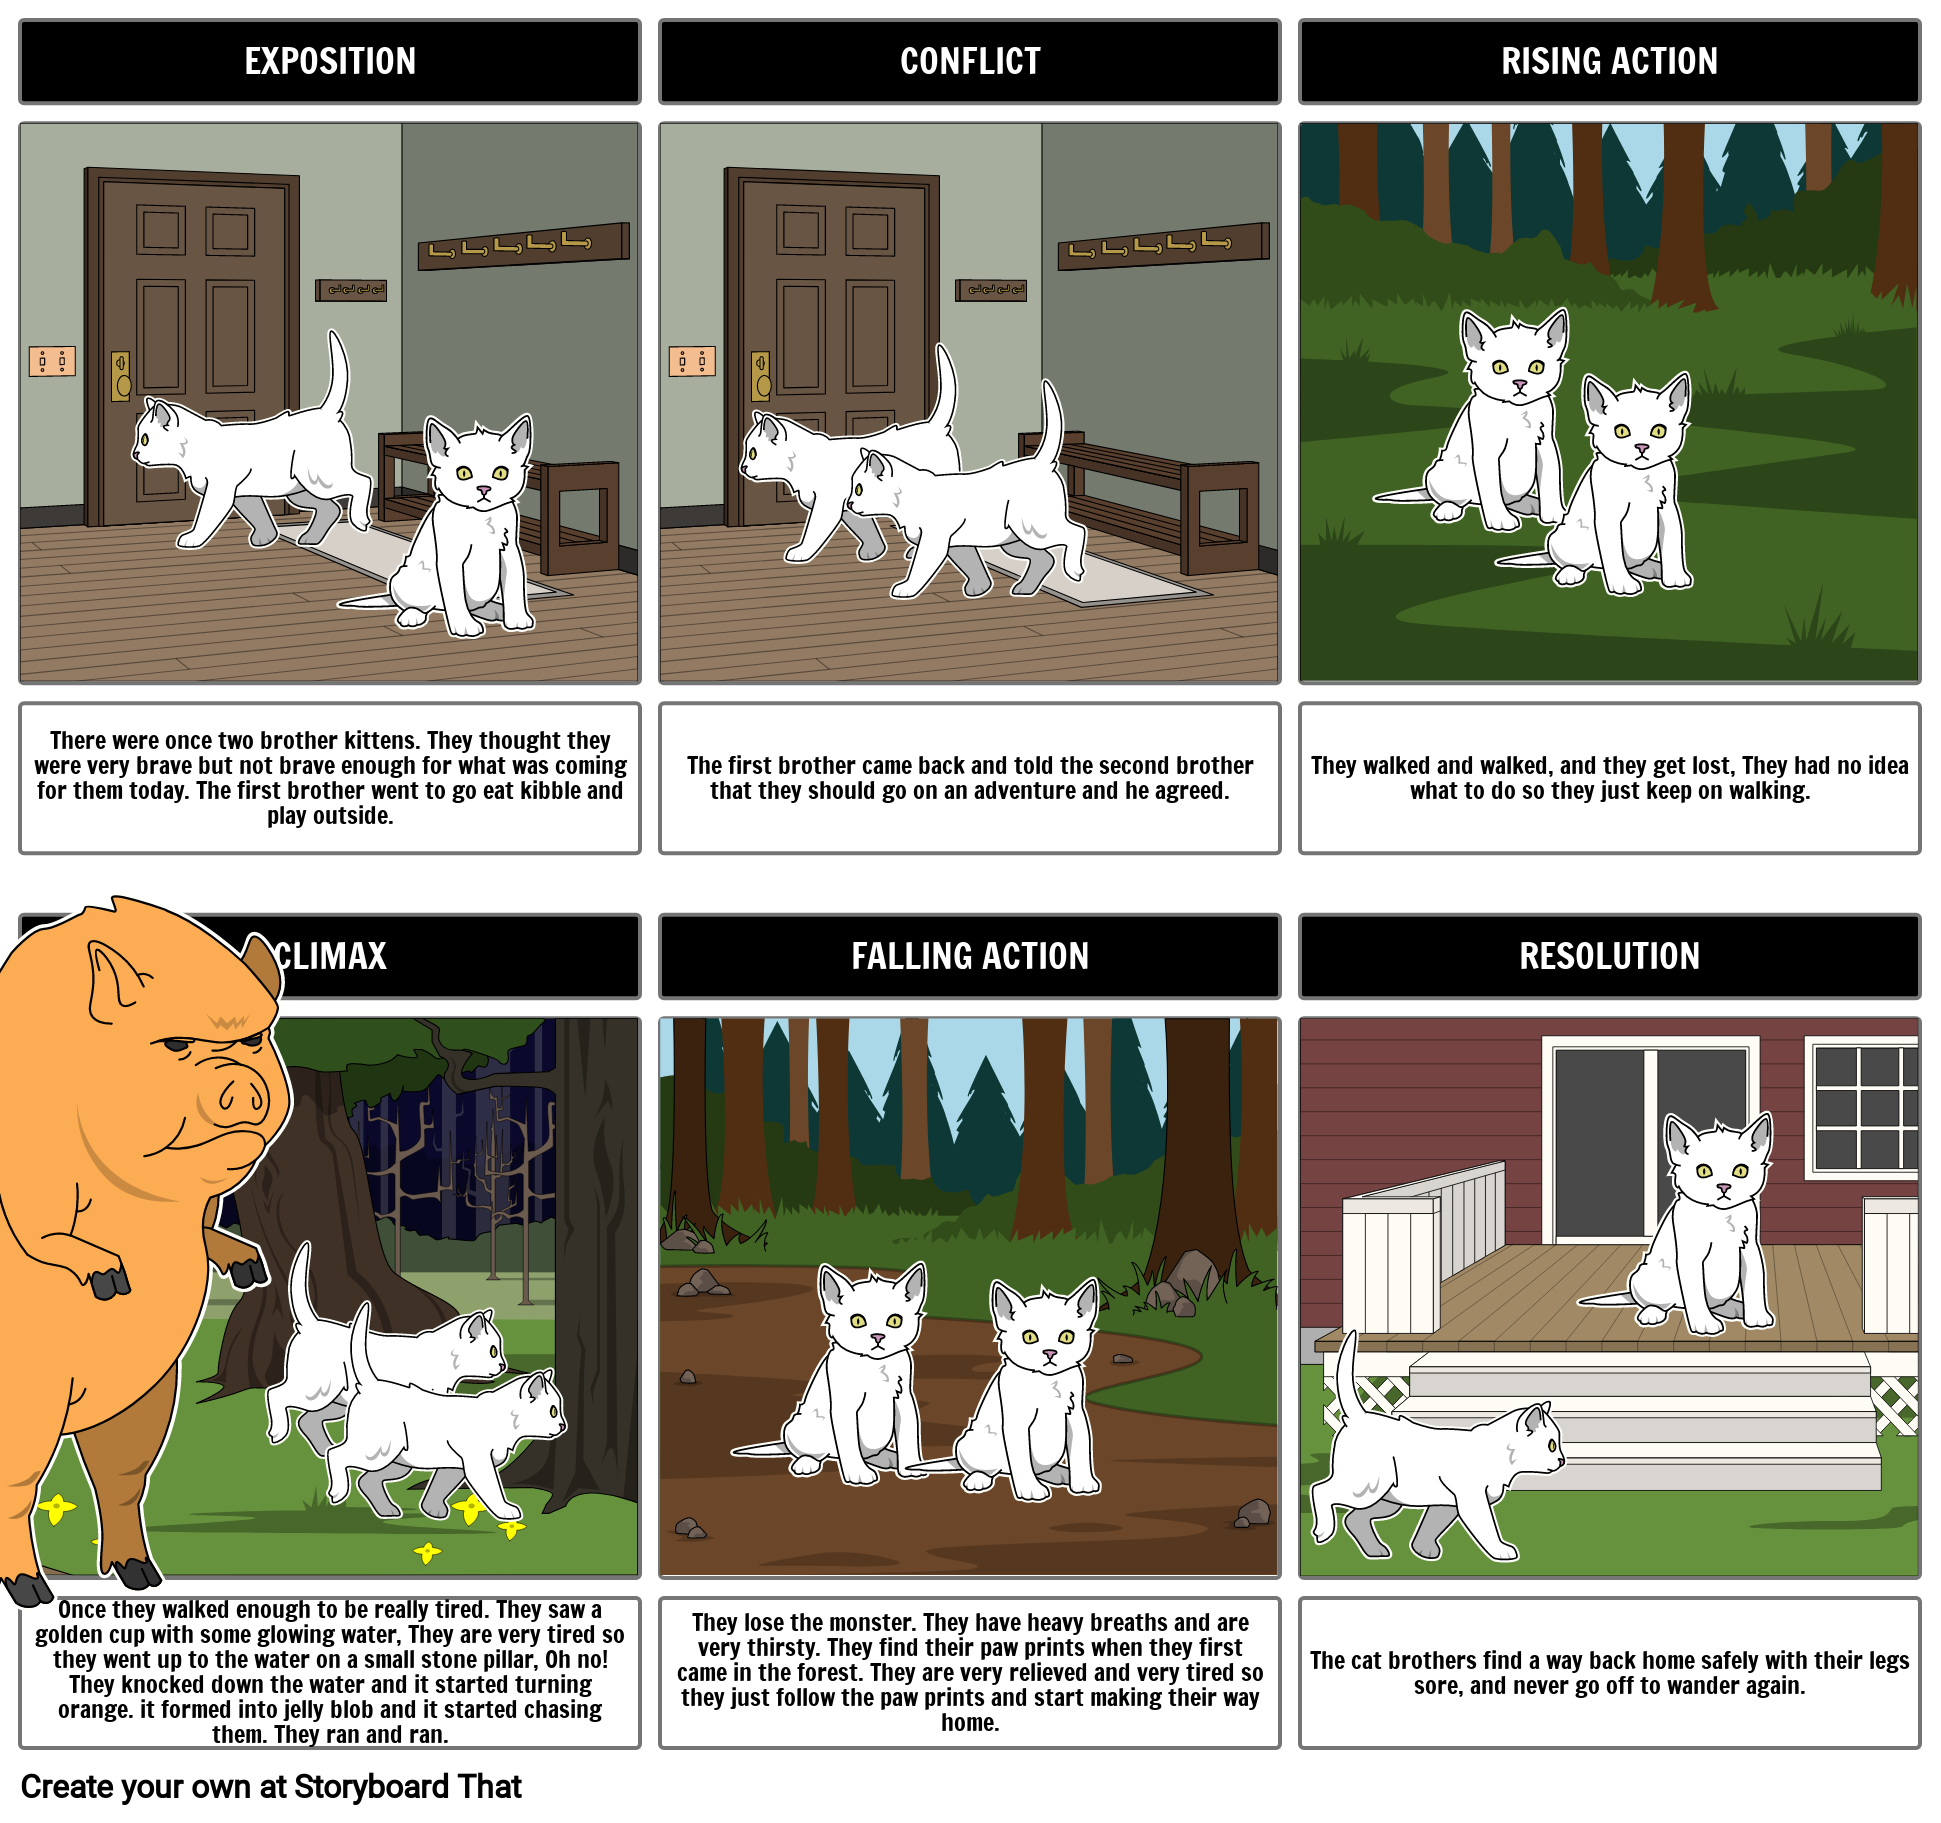
Stop Motion Animation: The Adventures of the Cats
Scratch Monster Mash Up: A Language Arts/Technology Project

This project was developed by Colleen Graves. I found information about how to do it at the Makey Makey blog post entitled, Scratch Coding Literacy Project Ideas for Makey Makey micro:bit Inventions. She designed it to be used with Scratch programming and the micro:bit micro-controller. I asked my students to create their monster mash ups using only Scratch programming. Scratch programming permits remixing of projects. I gave my learners a version of the project Colleen Graves shared so that they could remix hers and concentrate on creating their creatures and the accompanying text.
Standards Addressed
- CCSS.ELA-LITERACY.W.5.3
- Write narratives to develop real or imagined experiences or events using effective technique, descriptive details, and clear event sequences.
ISTE Standards for Students
- Students create original works or responsibly repurpose or remix digital resources into new creations.
- Students publish or present content that customizes the message and medium for their intended audiences.
Introduction
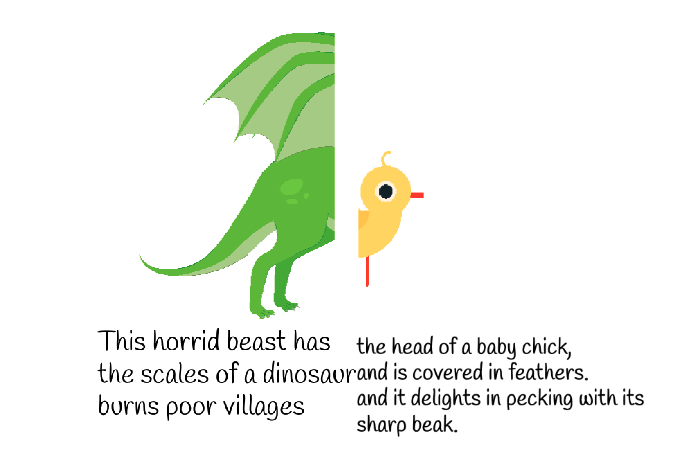
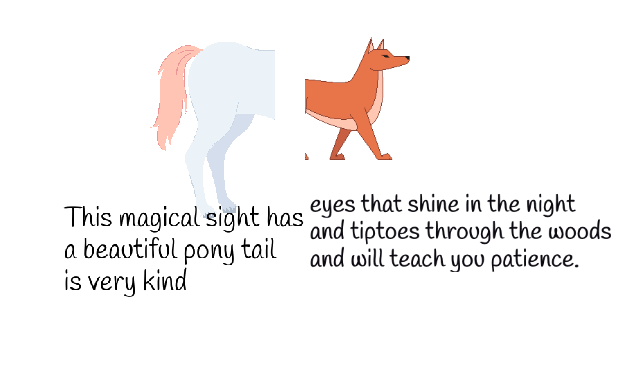
Students are shown and explore the book. Myth Match: A Fantastical Flipbook of Extraordinary Beasts. “ou might have heard of the unicorn and the griffin, but what about the unifin? This fantastical flipbook collects together magical and mythical creatures from all over the world, then lets you mix and match their fronts and backs to create even more wondrous beasts of your own!” See the video below for some examples from this book.
Main Activity: Creating Monster Mash Ups in Scratch Programming
Specific directions as to how to do this can be found in Colleen Grave’s blogpost, Scratch Coding Literacy Project Ideas for Makey Makey micro:bit Inventions. Below are some artifacts for this project.
The Template for the Writing Part
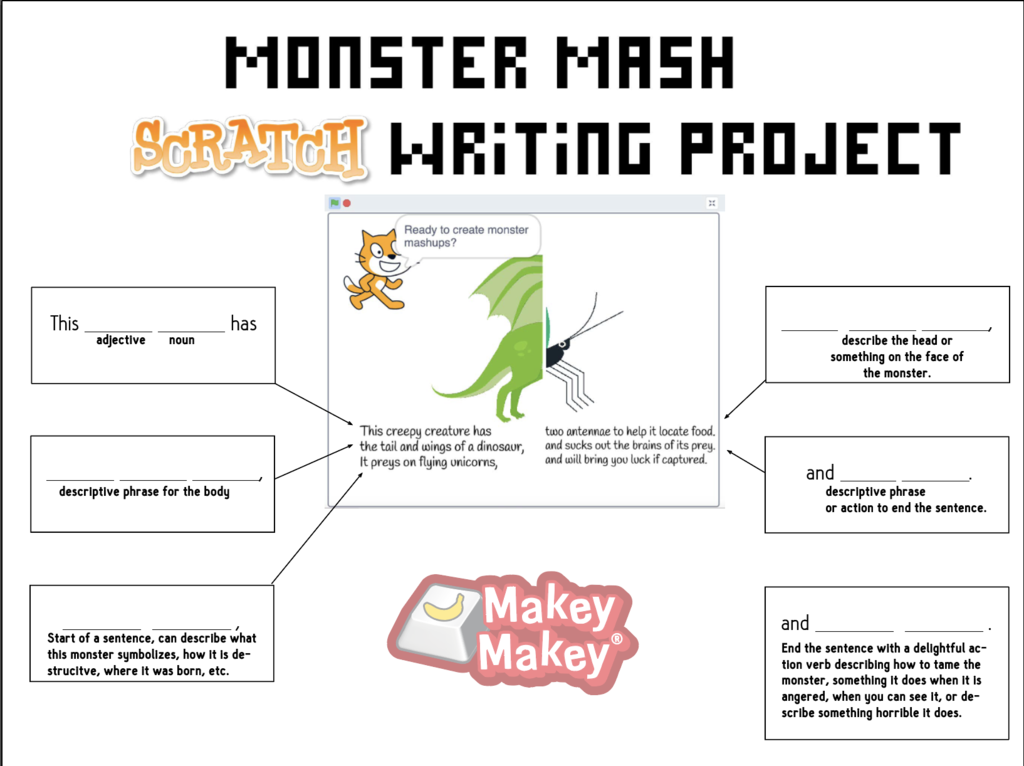
Some Examples of Monster Mash Ups Created in Scratch
A Finished Scratch Example (click on the image or the link below it)

Among Us Classroom Style: Another Case for Game-Based Learning
A few weeks ago, I blogged about my gaming club in Video Games for Relationship- and Team Building. It is still going very strong. Students from the three schools where I teach gifted students look forward to it all week long. We started with Fornite Creative but now they have moved onto Rocket League and Among Us. Recent research supports the positive benefits of playing video games:
With the UK in a second national lockdown due to the Covid-19 pandemic and Christmas on the horizon, many will stay indoors to play and socially connect through video games. New research from Oxford University has delivered a surprising finding; time spent playing games is positively associated with wellbeing (Groundbreaking new study says time spent playing video games can be good for your wellbeing).
This led me to seek out ways to use their interest in these games to teach academics. I cannot adequately express how grateful I am for educators’ generous and giving personalities as well for the social media platforms where they share resources and ideas. Since I know how much my learners love Among Us, I did an internet search for its use in classroom settings. I found a blog post by @SteinbrinkLaura entitled, How to Add Game Elements to Your Lesson: Among Us-Google Style! Using her ideas as well as some found on the New York Times article, Lesson of the Day: ‘With Nowhere to Go, Teens Flock to Among Us’, I created a language arts Among Us type of game. So, in essence, both language arts and SEL standards are addressed. Here is the slide deck I used with my upper elementary gifted students:
Here is the link to the presentation – https://docs.google.com/presentation/d/1Arrd1astkWMQw4iaQMCVuUJ5-miT_EochPB-JC6wOjA/edit#slide=id.p if you want to use it. You will need to make a copy if you want to use it as is or adapt it. Just remember that when using it with students, it should be as a shared doc meaning anyone with a link has editing permission. Here is a snippet of students playing this game:
At the end of the remote learning class where I used it, I heard the words I love to hear from students, “That was fun.” I plan to use this activity again with a different article and a different set of questions.
I never cease to be amazed on the power of games. I have been using games for decades with kids, with teens, and with college students. I have used board games, card games, competitive games, non competitive games, ice breakers, team building games, adventure games, and video games to teach. Their success rate in terms of student engagement and enjoyment is probably close to 100%. I know of no other instructional strategy that consistently have this success rate. My parting shot is a sketch-note by colleague John Spencer about the benefits of games:

Maker-Enhanced Writing Workshop: Character Development

Readers of my blog know my thoughts and feelings about effective student learning. I have written blogs on:
- All Lesson Should Be Interdisciplinary Learning – https://usergeneratededucation.wordpress.com/2019/01/13/all-lessons-should-be-interdisciplinary/
- The Imperative of Experiential and Hands-On Learning –https://usergeneratededucation.wordpress.com/2016/12/23/the-imperative-of-experiential-and-hands-on-learning/
- Authentic Learning Experiences – https://usergeneratededucation.wordpress.com/2019/01/20/authentic-learning-experiences/
- Intentional Creativity – https://usergeneratededucation.wordpress.com/2017/08/20/intentional-creativity/
- The Magic of Making: The Human Need to Create –https://usergeneratededucation.wordpress.com/2018/03/04/the-magic-of-making-the-human-need-to-create/
This month I started a maker-enhanced writing workshop with a group of gifted 3rd through 6th grade students. As with all of my lessons, I strive to practice what I preach in my blog posts – being interdisciplinary; using technology to enhance their work; and making, creating, innovating, and inventing.
Standards Addressed
21st Century Skills
- Elaborate, refine, analyze and evaluate their own ideas in order to improve and maximize creative efforts.
- Create new and worthwhile ideas (both incremental and radical concepts).
- Elaborate, refine, analyze and evaluate their own ideas in order to improve and maximize creative efforts.
- Develop, implement and communicate new ideas to others effectively.
- Articulate thoughts and ideas effectively using oral, written and nonverbal communication skills in a variety of forms and contexts.
Next Generation Science Standards
- Define a simple design problem reflecting a need or a want that includes specified criteria for success and constraints on materials, time, or cost.
- Evaluate competing design solutions using a systematic process to determine how well they meet the criteria and constraints of the problem.
Common Core State Standards – ELA
- Write narratives to develop real or imagined experiences or events using effective technique, relevant descriptive details, and well-structured event sequences.
National Core Arts Standards
- Students will generate and conceptualize artistic ideas and work.
ISTE Standards for Students
- Students use a variety of technologies within a design process to identify and solve problems by creating new, useful or imaginative solutions.
National Novel Writer’s Month Young Novelist’s Workbook
For this project, I use parts of the National Novel Writer’s Month Young Novelist’s Workbook found at https://ywp.nanowrimo.org/pages/educator-resources.
National Novel Writing Month (NaNoWriMo) is a fun, empowering approach to creative writing. The Young Writers Program (YWP) allows 17-and-under participants to set reasonable-but-challenging individual word-count goals.
The YWP also helps K–12 educators facilitate NaNoWriMo in schools, libraries, and community centers around the world. We provide virtual classroom spaces on our site, as well as student workbooks, Common Core-aligned curricula, and free motivational materials (https://ywp.nanowrimo.org/).
Since I work with 3rd through 6th graders, I use the one for elementary students. I also like the way it is formatted with lots of places to insert one’s own answers and ideas. Here is the PDF – elementary_school_workbook_ed4_INTERIOR.
Character Development
After some introductory information, the workbook jumps into character develop. I like having my learners begin by developing their characters. They did so by:
- Describing their character (pages 11 – 25 in the workbook).
- Drawing a picture of their characters.
- Creating a more artistic version of their character using additional art materials.
- Posting a description and image of their character onto Kidblog.
- Using Scratch and Makey Makey to describe the main characteristics of their characters.
Example Character Description and Artistic Creation

Programming Character Details Using Scratch and Makey Makey
The idea for this part of the lesson came from the Makey Makey Biography Bottles https://labz.makeymakey.com/cwists/preview/1506-biography-bottlesx. In the case of their character development, students programmed Scratch to tell a fact about their character upon the touch of each button.
The first step is to create the physical element, the character is glued onto a piece of cardstock (file folders work well for this). Holes are punched along the bottom – five for five facts and one for the Makey Makey ground wire. Large brass fasteners are inserted so that one of the fastener legs is bent to hold it in place and the other hangs over the edge. This permits the connection between the object and the Makey Makey.

Students then program Scratch so that when different fasteners are touched, a different fact about that character is verbalized. Scratch 3.0 now has extensions for Makey Makey and Text to Speech – both which are used for this project.


They upload a picture of their character and choose five facts about their character – one fact for each of the Makey Makey keys – space, up arrow, down arrow, left arrow, and right arrow. These facts are made via Text to Speech blocks. Students can even change accents and languages with these blocks.

Now you are ready to connect the Makey Makey! Connect alligator clips to the legs of the brass fasteners that protrude from the conductive plate. It is a good idea to mark which button you want to trigger each key press. Connect the other end of each alligator clip to the matching input on the Makey Makey. Make sure you have a clip attached to the ground. Connect the Makey Makey to the computer. Run your Scratch program. Hold the ground clip (making sure you are touching the metal part) and lightly touch each button (https://www.instructables.com/Biography-Bottles/ ).
To see how it all works, watch the video below:

